Bake Hello Kitty Cake for Joyful Celebrations
Want to brighten up your next celebration? Bake Hello Kitty Cake for Joyful Celebrations! This delightful cake brings smiles and unforgettable memories.

Alright, my friend, picture this: it’s your kiddo’s birthday, and all their friends are buzzing with excitement in your living room.
You want to nail that special cake that'll make all the kids squeal with delight. so, why not bake a hello kitty cake for joyful celebrations ? seriously, i mean, who doesn’t love hello kitty? that cute little character has been stealing hearts since i was a kid! and trust me, baking this cake can be a total game-changer for parties.
It’s like stepping into a time machine that whisks you back to childhood joy.
Thinking back, there was this one year when i tried to make a fancy cake from scratch. let’s just say, things didn’t go as planned.
But hey, that’s baking for you! this hello kitty cake is much easier, and perfect for anyone looking to dive into children’s cake recipes that pack a cute punch.
Plus, it’s not just about the taste; it’s about those smiles and laughter that come from a cake decorated like a beloved character!
Recipe Overview
A Sweet Piece of History
The hello kitty cake is like a dessert ambassador of happiness! originating from japan in the early '70s, hello kitty quickly became a pop culture icon loved by all ages.
Today, children and adults alike celebrate birthdays and special days with themed cake recipes that feature this adorable feline. the cake we’re whipping up is fluffy and light, with a vanilla base that practically dances on your tongue.
What to Expect
Now, if you’re a beginner baker, don’t fret! this recipe is medium in difficulty, but totally doable. prep time is about 30 minutes, plus another 30 for chilling—so yes, you can completely tackle this in a weekend afternoon! if you’re wondering about your wallet, the ingredients won’t break the bank, and you’ll get enough cake to serve about 12-16 happy party-goers.
Perfect, right?
Key Benefits
A Slice of Health
You might be thinking, “what’s in it for my health?” well, this cake has fewer preservatives than store-bought options, plus you know exactly how much sugar goes in there.
It’s better than many dessert for kids options lurking in the grocery store!
Unique Selling Points
This cake isn’t just a treat—it’s a showstopper. with its colorful decorations and hello kitty theme, it's also an excellent excuse to explore some fun cake decorating ideas .
Those decorating techniques you learn will come in handy for future baking endeavors, such as party dessert ideas for holidays or other celebrations.
Perfect for Every Occasion
No kidding, this hello kitty cake shines at any gathering! whether it's a birthday bash, a school celebration, or a simple family get-together, this colorful creation will turn heads and make mouths water.
Plus, when you serve it up, you can swap out hi-kitty for other characters for the next occasion—talk about festive cake ideas !
Standing Out Among the Rest
Compared to typical vanilla cakes, this hello kitty version features specialty decoration techniques that elevate it from ordinary to extraordinary.
There’s nothing basic about a cake that lets you practice fondant decoration techniques !
So, if you’re ready to wow your guests and craft something truly special, let’s dive into the ingredients you need to create your own captivating hello kitty masterpiece! you won’t just be baking; you’ll be sculpting smiles and delicious moments that everyone will remember for years to come.
Your Essential Ingredients Guide for Baking Magic
So, you’re ready to bake a hello kitty cake for joyful celebrations ? awesome! but before you dive into that adorable cake decorating adventure, let’s get your kitchen set up with some must-have ingredients and tips.
Trust me, having the right stuff on hand can turn an ordinary baking day into pure magic.
Premium Core Components
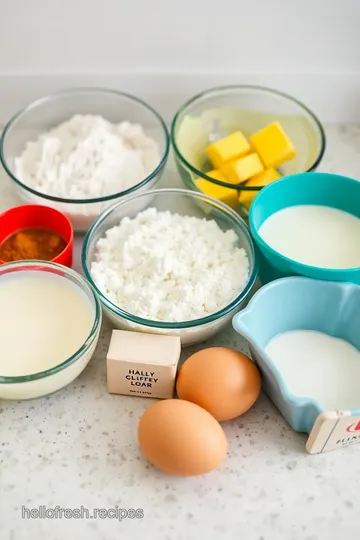
Let’s start with the essentials . Here are some key ingredients with detailed measurements that’ll make your baking life way easier.
- Flour: You’ll need 2 cups (250g) of all-purpose flour. This is your cake's backbone. Look for a brand that feels soft and has no lumps.
- Sugar: Grab 1 ½ cups (300g) of granulated sugar. A good tip? Crystals should be fine and free of hard clumps; that’s the sign of quality sugar.
- Butter: Use ½ cup (115g) of unsalted butter. The fresher the butter, the better your cake will taste! Keep it in the fridge, and it’ll last around 3 months .
Storage guidelines are key, folks! keep your flour in a cool, dry place in an airtight container. sugar can live in your pantry.
Butter also belongs in the fridge (or freezer if you’re into meal prepping).
Signature Seasoning Blend
Now, let's spice things up! For our Hello Kitty Cake, we want a delightful taste, right? Here are some essential seasoning options:
- Vanilla Extract: You’ll absolutely need 1 tsp (5g) of pure vanilla extract. It brings warmth and flavor.
- Salt: Just a pinch, ½ tsp (3g) , to balance sweetness. Seriously, never skip the salt!
Feel free to experiment! You can blend in spices like cinnamon or nutmeg for a unique twist on the basic flavor. It’s like inviting friends to the party—every little addition counts!
Smart Substitutions
We all have those moments when we're missing an ingredient! No worries, I've got you covered. Here are some easy swaps if you're in a pinch:
- No milk? Use buttermilk or even yogurt; it’ll add a nice tang.
- Out of eggs? Mash up some bananas or applesauce as substitutes.
- Gluten-free friend coming over? Swap all-purpose flour for a gluten-free blend—the cake will still rise and shine!
Kitchen Equipment Essentials
Okay, moving right along to tools! Here’s a list of must-have kitchen gear to get that cake from your oven to the table:
- Cake Pans: You’ll need two 9-inch round pans . Look for non-stick ones for easy removal.
- Electric Mixer: This beauty will help save your arms. If you don’t have one, a good ol’ whisk will work, but it’ll take longer!
- Piping Bags and Tips: These are super handy for all that buttercream frosting decorating.
Here’s a pro tip: When you’re done using your mixer, give it a quick wipe-down and store it on a shelf that's easy to reach. Makes life a breeze!
Let’s Get Cookin’!
Alright, now you've got the essential ingredients info, you're all set to start creating your very own hello kitty cake! with the right components, smart swaps, and some nifty tools, your cake will be the star at any celebration.
Next up, you'll want to check out the step-by-step instructions for baking and decorating, where we’ll make real magic happen.
Ready to roll? let's light that oven up!
Mastering Professional Cooking: Creative and Fun in the Kitchen
Cooking isn’t just about following recipes; it’s a wild adventure where your kitchen turns into a playground. if you’ve ever wanted to step up your game and bake a hello kitty cake for joyful celebrations , you're in for a treat.
Let’s dive into the nitty-gritty of professional cooking methods so you can whip up that cute cake and other delightful goodies without a hitch!
Essential Preparation Steps
Mise en place is like the ultimate cooking mantra. it means having everything in its place. before you even think about turning on the oven, gather all your ingredients and tools.
You wouldn’t want to be scrambling for a measuring cup while your buttercream frosting’s melting away, right?
Now, let's chat about time management. once you’ve got everything laid out, set a timer for each part of your process.
Honestly, timing is everything! aim for 25- 30 minutes of baking time at 350° f ( 175° c) for that hello kitty classic!
Next up, organization is key. keeping your workspace tidy helps prevent accidents. use separate bowls for dry and wet ingredients.
And speaking of safety, always remember to keep that kitchen clean. a clean kitchen is a happy kitchen, especially when you're baking for kids!
Step-by-Step Process
Alright, let’s break it down step by step.
- Preheat your oven. Seriously, don’t skip this step! Ovens take time to heat up. Set it to 350° F ( 175° C).
- Mix your batter. After combining your ingredients, you’ll need about 10 minutes of mixing before it’s ready to go.
- Measure doneness. Stick a toothpick into the center of your cake after 25- 30 minutes. If it comes out clean, it’s party time!
When you're working with buttercream frosting, know that you want it fluffy but still spreadable. That’s your visual cue for the perfect texture.
Expert Techniques
You’re here to learn like a pro, and that means mastering a few professional techniques. start with creaming your butter and sugar until light and fluffy—this is critical for that perfect cake crumb.
Here’s a troubleshooting tip : if your cakes sink in the middle, they were likely underbaked or overmixing happened. always make sure you’re lifting the mixing paddle to see how it looks; you want a nice, thick texture.
When you get to the frosting, use a vanilla buttercream recipe for that yummy flavor. it’s versatile and makes decorating a breeze.
Oh, and don’t forget to chill that frosting for about 30 minutes to let it firm up!
Success Strategies
Let’s chat about a few common mistakes to dodge. First, don’t skip the leveling of your cake layers! If one’s higher than the other, your Hello Kitty’s gonna look off-kilter.
Also, quality assurance isn’t just for big kitchens. It’s for you, too! Taste that frosting before slathering it on your cake—sweet enough? If not, tweak it until it is!
And here’s a cool tip for busy bakers: you can make your cake layers ahead of time—just wrap them up and pop them in the freezer.
When it’s party time, you’ll be glad you did this little save!
Additional Information
So, in the end, whether you're making a hello kitty birthday cake or just diving into fun cake decorating ideas , remember that your kitchen is your creative studio.
Stay organized, keep your timing on point, and you’ll nail those themed cake recipes every time!
Feeling inspired? look into into those cake baking guides and explore the world of kids' party food ideas. There’s a lovely cake waiting for you to create!
And who knows? You might even find yourself sharing your own DIY cake decorating triumphs with friends next time. Happy baking, everyone!
Pro Tips & Secrets
Alright, so you’re ready to bake hello kitty cake for joyful celebrations ? awesome! just like any good recipe, having a few insider tips can take your baking game from “meh” to “whoa!” here’s what i’ve learned from my own kitchen adventures.
Time-saving techniques: if you’re crunched for time, make the cake layers a day ahead. just wrap ‘em up tight and pop ‘em in the fridge.
This saves you some serious last-minute stress. you can whip up the frosting and do all your decorations the next day.
Seriously, trust me on this!
Flavor enhancement tips: let's be real, who doesn’t love a cake that packs a punch? add a hint of almond extract to your vanilla for a flavor upgrade.
The almond really compliments the vanilla and gives your hello kitty cake a unique twist. plus, experimenting with flavors is part of the fun—don’t be scared to play around!
Presentation advice: presentation is key in the baking world. using an offset spatula to create smooth frosting is a game-changer.
It helps you achieve a professional look, which is a total win for homemade cakes!
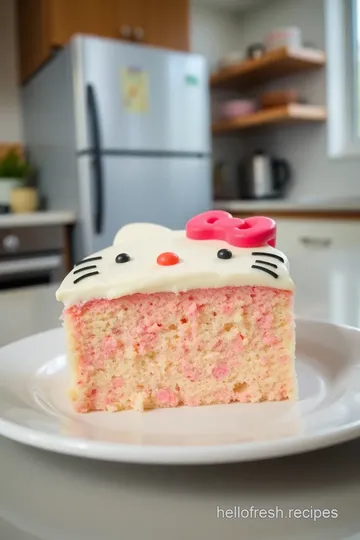
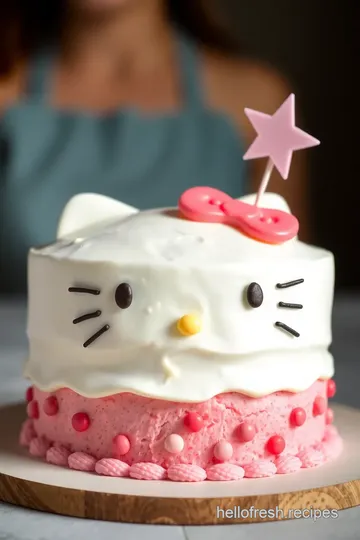
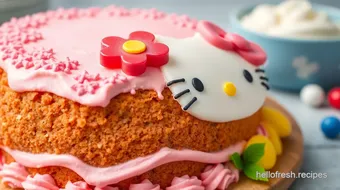
Perfect Presentation
Okay, now let’s talk pretty cakes. Because obviously, a Hello Kitty cake needs to look incredible!
Plating Techniques: Use a cake stand if you have one. It lifts your creation up and makes it feel extra special. Trust me, your cake deserves to be on display!
Garnish Ideas: Try cute, edible decorations, like little sprinkles or sugar stars. They give a pop of color that makes your cake jump off the table. Seriously, who can resist?
Color combinations: stick to a color palette that resonates with the hello kitty theme. think pastel pinks, whites, and a splash of black for her features.
These colors not only look cute but also reflect that playful spirit we all know and love.
Storage & Make-Ahead
Now, let’s get to the nitty-gritty of storing your cake.
Storage Guidelines: Wrap your cake in plastic wrap and store it in an airtight container. It keeps it fresh for about 3 days. But honestly, it usually disappears before that!
Reheating Instructions: If you’re making the cake ahead of time, just let it warm up at room temperature before serving. No one likes a cold cake—unless it’s ice cream cake!
Creative Variations
Feeling a little creative? Here are some ways to mix things up:
Flavor Adaptations: Kid-approved chocolate layers are always a hit. Or even throw in some zesty lemon for a fun twist.
Dietary Modifications: No problem! Use gluten-free flour to keep it inclusive for everyone. It’s just as delicious, and no one will be the wiser!
Complete Nutrition Guide
I get it; you want to know what you’re putting into your body.
Health benefits: this cake, while decadent, can be made a bit lighter by using less sugar or swapping out butter for applesauce.
It’s a clever way to keep the indulgence without the guilt!
Portion Guidance: A slice size of about 3x3 inches is perfect. Each piece is enough to satisfy that sweet tooth without going overboard.
Expert FAQ Solutions
You’ve got questions? I’ve got answers!
Common questions: “what if my cake sinks?” this can happen if your oven temp is too high or you didn’t beat your eggs enough.
A little extra air in those eggs goes a long way!
Success Tips: Always trust your instincts while baking. If something doesn’t feel right, it probably isn't! Feel free to improvise.
Let’s wrap this up! baking can be such a joyful experience, especially when you’re crafting something as cute as a hello kitty birthday cake ! so, don your apron, gather your ingredients, and get ready for some cake magic.
Whether it’s a fun family get-together or a kids’ party, this cake is gonna steal the spotlight. you got this! happy baking and may your celebrations be extra joyful!
Bake Hello Kitty Cake for Joyful Celebrations Card
⚖️ Ingredients:
- 2 cups (250g) all-purpose flour
- 1 ½ cups (300g) granulated sugar
- ½ cup (115g) unsalted butter, softened
- 1 cup (240ml) milk
- 3 large eggs
- 2 ½ tsp (10g) baking powder
- 1 tsp (5g) vanilla extract
- ½ tsp (3g) salt
- 1 cup (230g) unsalted butter, softened (for frosting)
- 4 cups (480g) powdered sugar
- ¼ cup (60ml) heavy cream
- 1 tsp (5g) vanilla extract (for frosting)
- Pink, yellow, and black gel food coloring
- Fondant (white and colored for accents)
- Edible silver pearls (optional)
🥄 Instructions:
- Step 1: Preheat the oven to 350°F (175°C). Grease and flour two cake pans.
- Step 2: In a mixing bowl, cream together butter and sugar until fluffy.
- Step 3: Add eggs one at a time, mixing well after each addition, then mix in the vanilla extract.
- Step 4: In a separate bowl, combine flour, baking powder, and salt. Gradually add to the wet mixture, alternating with milk until well combined.
- Step 5: Divide the batter evenly between the prepared pans.
- Step 6: Bake for 25-30 minutes or until a toothpick inserted in the center comes out clean.
- Step 7: Let the cakes cool in pans for 10 minutes, then transfer to wire racks to cool completely.
- Step 8: Prepare the buttercream frosting by beating the softened butter until creamy, then gradually add powdered sugar, cream, and vanilla.
- Step 9: Once cakes are cool, level the tops and place one layer on a cake board.
- Step 10: Frost the top of the first layer, then place the second layer on top and frost the entire cake.
- Step 11: Color portions of the buttercream for decoration and transfer to piping bags.
- Step 12: Use colored fondant to craft Hello Kittys features and adorn the cake.
- Step 13: Decorate with edible pearls and any additional decorations as desired.
Previous Recipe: How to Make a Whimsical Crock Pot Quinoa Hello Kitty Meal in 6 Hours
Next Recipe: How to Master Searing Beef Wellington with Mushroom Duxelles at Home