How to Bake a Hello Kitty Cake - A Fun & Sweet Delight!
Discover how to bake a delightful Hello Kitty cake - my kids love it! Perfect for birthdays, it's fluffy with rich buttercream. Let's bake together!

Bake Hello Kitty Cake - Fun & Sweet Delight: An Introduction
So, picture this: i’m knee-deep in a fun project with my kiddos, trying to whip up something special for a birthday bash.
The smiles on their faces as they watch me bake this hello kitty cake are priceless. oh my gosh, can you believe how excited kids get over a cake? it got me thinking, why not share this delightful recipe? if you want to create a show-stopping dessert that brings joy and sweetness to any gathering, you’re gonna want to bake hello kitty cake - fun & sweet delight !
Now, here’s the scoop: this cake is more than just a snack. it’s an experience! this whimsical cake merges light vanilla with that dreamy vanilla buttercream frosting , making it a hit for kiddos and adults alike.
Plus, those cute cake designs ? adorable and totally instagram-worthy!
Recipe Overview
First things first, let’s nerd out for a second. this kind of cake has been around thanks to the beloved feline character, hello kitty, making her debut way back in 1974.
Fast forward to today, and she’s still super popular, especially for kids’ parties! the cake embodies that quirky sweetness we all adore, and it's perfect for those birthday cake ideas floating around in your head.
Honestly, it’s an awesome way to make any gathering feel special.
Worried about the difficulty level? don’t be! i’d call it medium . while the cake itself is straightforward to bake, the decorative elements can get a little tricky—especially if you’re not familiar with cake layering techniques .
But trust me, it’s totally worth it!
Let’s chat time. you’ll spend about 30 minutes prepping and then 30 minutes baking , with an overall time of about 1 hour and 30 minutes .
And when it’s all said and done, you’ll have roughly 8 servings to share—perfect for a small gathering or a family treat!
When it comes to cost, it’s pretty reasonable. most of the ingredients are ones you likely already have stashed in your pantry.
Flour, sugar, butter—simple stuff! it won’t break the bank, and the smiles you’ll get? priceless!
Key Benefits
Alright, let’s talk about why this cake rocks. First off, you’re whipping up something that brings people together. It’s not just a cake; it’s a celebratory cake for kids that makes everyone say, “Ooh, pretty!” How cool is that?
Health-wise, while this isn’t your kale salad (let’s be real), it can be a part of a balanced diet when enjoyed as a treat.
If you’re worried about dietary needs, you can easily use dietary-friendly cake recipes or swap some ingredients around. there’s always room for substitutions in baking!
This cake is perfect for themed cake decorations —think hello kitty-themed parties, playdates, and birthdays. everyone loves a good character-themed cake, and this one will definitely up your party’s game! you can even use edible cake decorations to personalize it; the kids can help with that, making it a fun family baking project.
So, if you’re looking for a touch of whimsy in your birthday dessert inspiration , you’ve come to the right place! get your baking essentials together, and let’s roll into the ingredient section for this sweet adventure.
I promise, once you give this hello kitty cake recipe a go, you’ll want to make it again and again!
Your Go-To Essential Ingredients Guide: Make Baking a Breeze!
Baking can feel overwhelming sometimes, but it's all about knowing your essential ingredients. trust me, once you get the hang of it, you'll be baking hello kitty cakes like a pro in no time! whether you're whipping up kid-friendly desserts or diving into whimsical desserts, let’s make sure you’ve got everything you need to succeed.
Premium Core Components for Success
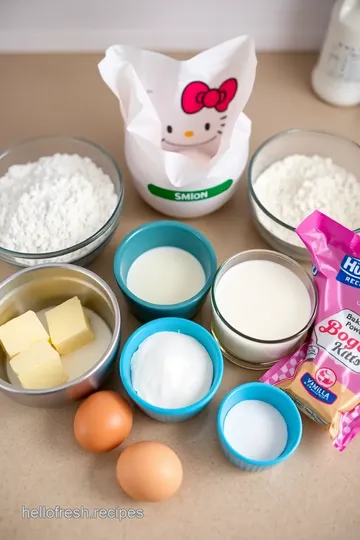
Measurements are key: let's chat about ingredients. when it comes to baking, the right amounts lead to sweet success. for example, use 2 cups of all-purpose flour (250g) , about 1 ½ cups of granulated sugar (300g) , and don’t forget that ½ cup of unsalted butter (113g) needs to be softened to room temp before creaming with your sugar.
Quality Matters: Look for butter that's creamy and fresh-smelling. Your flour shouldn’t have any weird lumps. Trust your nose here; freshness = flavor!
Storage know-how: store ingredients in a cool, dry place. did you know that uncooked flour lasts about 1 year ? keep it nice and sealed! and here’s a pro tip: refrigerate your butter if you won’t use it for a while.
It'll keep longer that way.
Freshness Tips Galore: Pick the ripest eggs and the most fragrant vanilla you can find. Fresh ingredients make everything better!
Signature Seasoning Blend for a Flavorful Adventure
You want to make your cake pop, right? it’s all about the signature seasoning blend ! essential spices can really elevate things.
Classic combinations like cinnamon and nutmeg can add depth to your batter.
Herbs and Pairings: While you might not think herbs suit cake, a hint of mint or basil could mix things up beautifully in frostings, especially in summer!
Flavor Enhancers: Think about adding zesty citrus zest for that extra oomph. It brightens everything up, trust me!
Regional Alternatives: If you're feeling adventurous, throw in a dash of chai spice for a uniquely flavored cake with some warmth.
Smart Substitutions: Backing You Up
Okay, life happens! Sometimes, you just don’t have the exact ingredient on hand. No problem!
Common Alternatives: You can use Greek yogurt instead of sour cream in some recipes.
Dietary Modifications: Need a dairy-free option? Almond milk works wonders in most cakes.
Emergency Replacements: No eggs? Mix 1 tablespoon of chia seeds with 3 tablespoons of water and let it sit for a few minutes – you've got yourself a binding agent!
Seasonal Options: If fruits are in season, toss in some mashed banana or pureed pumpkin for a richer, delish flavor.
Kitchen Equipment Essentials for Every Baker
You don't need a million fancy gadgets, but there are a few must-haves. Grab your mixing bowls, a reliable mixer (hand or stand), and those trusty 9-inch round cake pans !
Alternative Options: Can't find a cake turntable? Use a serving plate – it can do the job in a pinch.
Prep Tips: Keep your equipment clean and organized. Messy kitchen = messy cake. Oh, and buy a good set of measuring cups! It can make a world of difference.
Storing Cake Supplies: Invest in stackable containers for your baking supplies. Little hacks like this keep your kitchen tidy and sparkly!
Now that we're armed with the essential ingredients and clever shortcuts, it's time to get creative! let’s dive into making that cute bake hello kitty cake - fun & sweet delight .
Your birthday cake ideas just got a major upgrade, and trust me, everyone will adore those fun baking for kids techniques you'll be rocking!
Ready to mix, bake, and decorate? Let’s roll!
The Art of Professional Cooking: A look into into Deliciousness
Remember that time you decided to host a birthday party and thought, “i’ll just whip up a cake!”? yeah, me too.
The excitement quickly turns to sheer panic as you juggle flour, eggs, and the pressure of cooking perfection. that’s where professional cooking methods come into play! today, we’re unpacking how to nail those essential preparation steps and master your kitchen like a pro.
Plus, we’ll touch on something super fun: the hello kitty cake recipe . trust me, you’ll want to stick around for this!
Essential Preparation Steps
Mise en place. it sounds fancy, right? but it just means having everything in its place. when you’re baking, like making a whimsical hello kitty cake, gather all your ingredients beforehand.
You'll be amazed at how much smoother everything goes. settle in, prep your pans, and let’s keep that kitchen chaos to a minimum!
Time management is key. you need to efficiently split your tasks. while your cake is in the oven baking at 350° f ( 175° c) , you can whip up that vanilla buttercream frosting .
How awesome is that? oh, and don’t forget to keep an eye on the clock. the timer is your best friend here!
Organization strategies will help you stay focused. stack your bowls and utensils in groups. keep dry ingredients on one side and wet on the other.
That way, when you’re ready to mix, it’ll feel like a breeze!
Lastly, be mindful of safety considerations. got a hot oven? don’t open that door too much! and please, be careful with those sharp knives when you level your cake.
Ouch! we want sweet treats, not band-aids.
Step-by-Step Process
Now, let’s lay it out. Here’s how you tackle the big cake challenge:
-
Preheat the Oven : You’re going to want to start here! Set that oven to 350° F ( 175° C) .
-
Prepare Cake Pans : Grease and line those bad boys. Parchment paper will save your cake’s life!
-
Make the Batter : Yup, cream that butter and sugar like a boss. Mix in your eggs and extracts before slowly adding in the dry stuff.
-
Bake : This part is crucial. You want to bake for 25- 30 minutes until a toothpick comes out clean.
-
Cool : let your cakes chill in the pans for about 10 minutes before transferring them to a wire rack.
We want them cool all the way before we dive into decorating!
When it comes to timing precision , trust your instincts and that timer. And those visual cues for doneness ? Look for that golden-brown edge on your cake!
Expert Techniques
Getting pro-level results means knowing some little secrets.
-
The quality checkpoints are vital. Taste your batter! It’s a crucial step to ensure the flavor is just right.
-
For buttercream , achieving the perfect texture is an art. Start with soft butter; it should look creamy, not too runny.
-
If your cake has sunk in the middle? You might’ve opened the oven too soon or mixed too much.
Success Strategies
Avoid common mistakes! Remember, baking is precise. It’s not some fly-by-night throw-together. Things like leveling your cake tops can be game-changers. Keep it balanced for better stacking.
Need some quality assurance tips ? If you’re unsure, use a cake tester. And for that, don’t wing it . Keep these delicious birthday cake ideas in mind: colorful decorations always wow the crowd!
The last tip? Have some make-ahead options! Freeze those layers when you’ve done with them. That way, you can whip them out anytime you want to impress.
Additional Information
Armed with these cake preparation tips , you’re ready to tackle that bake hello kitty cake - fun & sweet delight ! the sweet balance of vanilla and almond is about to brighten up your kitchen.
And remember, whether you're baking with kids or enjoying a family baking project, it’s all about the experience. just think, next time you flip on that mixer, you could be crafting a cake that not only tastes good but also becomes a centerpiece at celebrations!
Happy baking, and may all your cakes be soft, fluffy, and absolutely delicious! If you're ready for even more -- stick around for the next exciting section!
Pro Tips & Secrets for the Hello Kitty Cake
When diving into this hello kitty cake recipe , a little help goes a long way! first off, don’t skip the chilling step .
After frosting, popping the cake in the fridge for about 30 minutes helps the buttercream set up nicely. you’ll end up with tidier slices—trust me, it’s worth it!
For time-saving techniques, have your ingredients room temperature before starting. it helps everything mix together better and reduces your overall prep time.
Also, consider using a box mix for the cake layers if you’re pressed for time. hey, no judgment! everyone deserves a break, especially when planning a party.
To enhance the flavor, don’t be afraid to get a bit creative with your extracts. a dash of almond extract adds a nice hint of sweetness that people will love.
And if you’re feeling adventurous, try incorporating a swirl of jam or another flavor into your frosting!
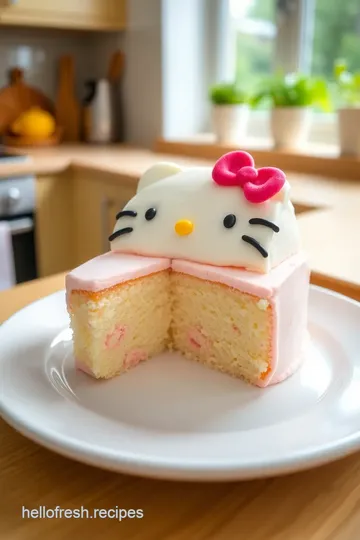
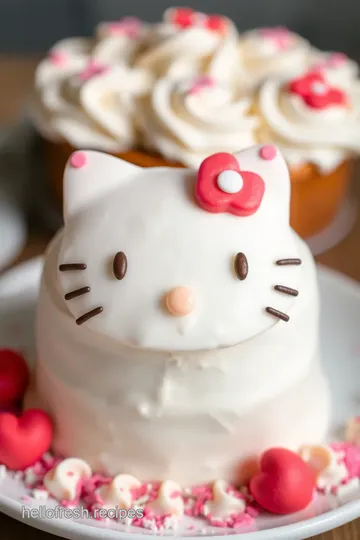
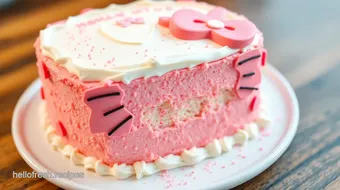
Perfect Presentation: Make It Pop!
Okay, let’s chat about plating and making this cake an instagram star! for a professional look, try layering your cake neatly.
Use the offset spatula to smooth the frosting on top and around the sides. but remember, perfection isn’t necessary—just aim for that whimsical vibe!
For garnishes, edible decorations like pink and white sugar pearls bring a touch of cuteness that can’t be beaten. you can also add colorful sprinkles to tie into a theme.
Think about contrasting colors, too—pink frosting on a white cake looks stunning!
Storage & Make-Ahead Tips
Now, let’s talk storage. if you’ve got leftovers (which i doubt, but hey! it happens), cover your cake with plastic wrap and stick it in the fridge.
It’ll stay fresh for up to three days . to keep that vanilla buttercream frosting looking fab, try to restore it to room temp before serving.
If you want to make this cake ahead of time, bake the layers a day before and store them wrapped in plastic wrap at room temperature.
Assembling the cake at the last minute keeps it looking fresh and delicious!
Creative Variations for Everyone
This hello kitty cake is just the starting point! want a chocolate twist? swap the vanilla cake for a rich chocolate version! or add filling between the layers—a unique cake filling like raspberry jam or lemon curd doesn't just add flavor, it introduces a surprise element too.
If you’re dealing with dietary-friendly cake recipes , think gluten-free or dairy-free. Use gluten-free flour and substitute almond milk for the milk. Wow your guests with a cake that meets everyone's needs!
Complete Nutrition Guide
Now that we’ve polished up our cake, it’s smart to consider what’s in it, right? each serving is about 450 calories , and offers a sweet treat with 20g of fat.
While it’s definitely a celebratory cake meant for the fun of parties, it’s made with real ingredients—something i think is super important.
Portion guidance? Keep it to one slice for the best balance of indulgence and enjoyment. If you’re serving kids, they’ll be thrilled just to see cute cake designs !
Expert FAQ Solutions
You might be wondering about some common cake conundrums. What if your cake collapses? That could be due to either underbaking or too much liquid—check your measurements next time!
Another fun tip: if your frosting is too thick, add a touch of milk to get that perfect buttercream texture .
And for those decorating nightmares, remember: even if the design isn’t perfect, it’s the thought that counts!
Closing Encouragement
So there you have it—your roadmap to the bake hello kitty cake - fun & sweet delight . this recipe isn't just about making a cake; it's about creating memories with family and friends.
Whether it’s a birthday bash or just a regular tuesday, bringing everyone together for some fun baking for kids is what it’s all about! get your aprons on and make some magic in the kitchen! you got this!
How to Bake a Hello Kitty Cake - A Fun & Sweet Delight! Card
⚖️ Ingredients:
- 2 cups all-purpose flour (250g)
- 1 ½ cups granulated sugar (300g)
- ½ cup unsalted butter, softened (113g)
- 1 cup milk (240ml)
- 3 large eggs
- 2 teaspoons baking powder (8g)
- 1 teaspoon vanilla extract (5ml)
- 1 teaspoon almond extract (5ml)
- A pinch of salt
- 1 cup unsalted butter, softened (226g)
- 4 cups powdered sugar (480g)
- 2 tablespoons heavy cream (30ml)
- 1 teaspoon vanilla extract (5ml)
- Pink gel food coloring (optional)
- Edible black gel (for eyes and whiskers)
- Edible pink and white sugar pearls (optional)
🥄 Instructions:
- Step 1: Preheat your oven to 350°F (175°C).
- Step 2: Grease and line two 9-inch round cake pans with parchment paper.
- Step 3: In a mixing bowl, cream butter and sugar.
- Step 4: Add eggs one at a time, mixing well after each.
- Step 5: Incorporate milk, vanilla, and almond extracts.
- Step 6: In another bowl, whisk together flour, baking powder, and salt.
- Step 7: Gradually mix dry ingredients into the wet mixture until smooth.
- Step 8: Divide batter evenly between the prepared pans.
- Step 9: Bake for 25-30 minutes until a toothpick inserted comes out clean.
- Step 10: Let cool in pans for 10 minutes, then transfer to wire racks to cool completely.
- Step 11: Beat softened butter until creamy.
- Step 12: Gradually add powdered sugar, then heavy cream and vanilla. Mix until fluffy.
- Step 13: If desired, mix in pink gel food coloring.
- Step 14: Level the tops of the cooled cakes if necessary.
- Step 15: Place one layer on the cake plate and spread a layer of frosting on top.
- Step 16: Stack the second layer and frost the top and sides.
- Step 17: Use tools to shape and create Hello Kittys face.
- Step 18: Use edible black gel for eyes and whiskers, and decorate with pink and white sugar pearls.
- Step 19: Slice and enjoy!
Previous Recipe: How to Master Searing Beef Wellington with Mushroom Duxelles at Home
Next Recipe: Delicious Sizzling Tex-Mex Chicken Skillet Delight: An Easy Weeknight Winner!