Bake Hello Kitty Cookies for Sweet Joy
Wondering how to bake Hello Kitty cookies? These buttery treats bring sweet joy to any occasion! Let's dive into my favorite decorating tips.

Let’s Bake Some Sweet Joy!
Hey there, fellow bakers! so, picture this: it’s a rainy saturday afternoon, and my kitchen smells like butter and sugar—basically, heaven on earth.
I grab my apron, ready to whip up some of the cutest cookies ever. are you ready to bake hello kitty cookies for sweet joy ? trust me, these bad boys are not just for kids; they’ll have adults grinning like it’s their birthday.
Baking with a fun theme truly makes any project more delightful, doesn’t it? i remember the first time i stumbled upon hello kitty cookie recipes.
My niece was obsessed, and i thought, “why not turn this into a baking party?” that’s right – we got a little crazy with those themed baking activities .
Who doesn’t love a reason to get messy and sprinkle some joy?
Recipe Recap: History Meets Happiness
Let’s dive into a bit of history. did you know that hello kitty made her debut in japan in 1974? she’s been spreading sweetness ever since! fast forward to today, and she’s everywhere, from school supplies to cakes.
The hello kitty cookie recipe has become a fan favorite for good reason; these buttery vanilla cookies are perfect for any occasion.
As for the nitty-gritty, making these cookies is a fun project but can be a tad tricky when it comes to the cookie shaping tips .
The process takes about an hour and ten minutes, which includes chilling time, so it doesn’t feel overwhelming. quick note: it yields around 24 cookies , enough to share or hide away for yourself (no judgment here!).
Sweet Perks of Baking Cookies
Now, why would you want to bake these adorable cookies? totally several good reasons! first off, the health benefits ! okay, okay, let's not pretend cookies are healthy, but when made at home, you have the power to control ingredients and cut back on crazy preservatives.
I mean, these cookies are not just delicious but can be made with real sugar and butter , giving them this satisfying taste that store-bought can never compete with.
Plus, they’re perfect for special occasions ! whether you are celebrating a birthday, or throwing a cute gathering, these hello kitty themed treats will totally steal the show.
With festive cookie designs created by you, it adds that special touch that everyone will adore. you can also whip them up for holiday cookie baking.
Trust me; you’ll be the favorite aunt or uncle instantly.
Oh! and let’s not forget the creative cookie ideas for parties . kids love to decorate; give them icing and some toppings—think rainbow sprinkles for decoration , and you've got a mini baking party happening.
Plus, they’ll learn about measuring and mixing— baking with kids is always a good time!
Transitioning to Ingredients
Alright, my cookie-loving friends, i don't want to keep you in suspense about what you need for this joyous baking adventure.
Next up, we will dig into the yummy ingredients that will transform your kitchen into a bakery filled with sweet bliss.
Get ready to gather your supplies—let’s make those adorable hello kitty cookies!
Essential Ingredients Guide
Baking is such a joy, right? but you really gotta have the right ingredients on hand to pull off those sweet baked goods like bake hello kitty cookies for sweet joy .
Let’s dive into the essential stuff!
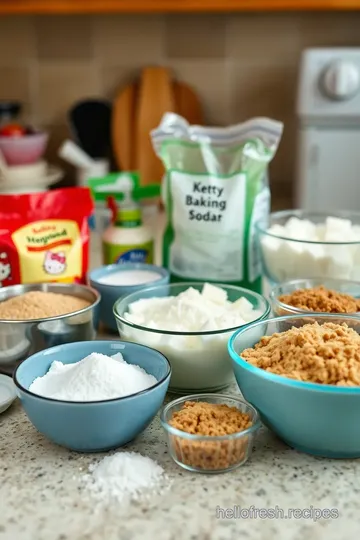
Premium Core Components
First up, let's talk measurements . for our cookie recipe, you’ll need 2 ¾ cups (350 g) of all-purpose flour, 1 cup (226 g) of butter (room temperature, of course!), and a few other goodies.
It’s crucial to have the right amounts, so a good kitchen scale is a lifesaver for both us & metric measurements.
Now, about quality indicators ! when you grab that butter, check for freshness. it should be firm and held tightly wrapped.
No odd smells! for flour, look for a nice, even texture. stale flour? no, thanks!
As for storage guidelines , keep your flour and sugar in airtight containers. they’ll stay fresh for months! butter, though? store that in the fridge or even the freezer for longer shelf life.
Oh, and always put your spices in a cool, dry spot to keep their flavor kicking.
Need some freshness tips ? check your eggs before using; they should feel heavy for their size. and for vanilla, well, you can't go wrong with real extract.
Just grab it and sniff. yes, you can sniff your extracts!
Signature Seasoning Blend
Now, the magic is all in the spices . a classic sugar cookie with a touch of vanilla really brings those buttery flavors out.
For our hello kitty cookies, the key is 1 teaspoon of vanilla extract . but don't stop there! you can add a pinch of nutmeg or even a splash of almond extract for a nice twist.
Pairing your herbs wisely can elevate your cookie game. Rosemary might sound crazy, but a pinch can add depth! Just be careful not to overwhelm it.
Have you thought about regional variations ? In the South, they might love a touch of lemon zest or even sweet tea flavors! Go wild with it!
Smart Substitutions
Ready for some smart substitutions ? running low on butter? swap it with applesauce for a lighter cookie. if you have any dietary restrictions, make the dough vegan by using coconut oil instead of butter.
Seriously, no one will even know!
Need a last-minute emergency replacement ? If you’re out of powdered sugar for that royal icing, grind up granulated sugar in a blender until fine—it works! And guess what? Seasonal goodies like pumpkin puree can give your cookies a unique twist!
Kitchen Equipment Essentials
Listen, having the right kitchen equipment can make all the difference. you don’t need a fancy stand mixer; a good old hand mixer works just fine.
But let’s not forget about must-have tools! you will absolutely need a rolling pin , baking sheets , and your cookie cutter for all those cute shapes.
If you don't have a piping bag, ain't no shame in using a plastic sandwich bag with a corner snipped off! trust me, it works like a charm for those intricate royal icing techniques we all love.
And ya know what’s just as important? your storage solutions . keep your baked cookies in an airtight container to maintain their freshness for days.
I mean, if they last that long—these hello kitty cookies tend to disappear quick!
So, now that we've laid down the foundation, let’s get ready to whip up some hello kitty themed treats and make family baking time one for the books! it's time for some joyfully creative cookie ideas for parties! next up, we’ll dive right into those instructions for our cute cookie decorating ideas .
Get your ingredients ready, and let’s get baking!
Mastering the Art of Baking Hello Kitty Cookies!
Alright, my baking buddies, gather 'round because we're diving into something both sweet and adorable— hello kitty cookies ! seriously, who wouldn’t want to whip up these delightful little treats? they’re not just cookies; they’re little bundles of joy.
If you're looking for fun baking projects, or just some quality family baking time, bake hello kitty cookies for sweet joy should be at the top of your to-do list.
Essential Preparation Steps
Let’s kick things off with mise en place . first, gather all our ingredients: we need 2 ¾ cups of flour, 1 cup of unsalted butter (softened, of course), and some sugar, eggs, and vanilla for that delicious flavor.
If you're a newbie, trust me, having everything ready makes the process smoother than a buttercream icing.
Time management is key. you're going to want about 20 minutes to prep the dough and then let it chill for roughly 30 minutes .
Don’t rush this—chilling is what helps your cookies keep their cute shapes when baking. if you juggle tasks while waiting, you might just become a baking superhero!
Keep your workspace organized. trust me, it’s a must! a cluttered kitchen can lead to, well, cookie chaos. and remember, safety first! watch out for that hot oven—set it to 350° f ( 175° c) before you arrive.
Step-by-Step Process
Here’s how to make this magic happen:
-
Whisk flour, baking powder, and salt together in a bowl. Easy peasy, right?
-
In another bowl, cream together that softened butter and sugar until light and fluffy. Aim for a nice pale yellow—about 3- 5 minutes should do the trick.
-
Add in your egg and vanilla. Mix until everything's combined.
-
Gradually combine the dry ingredients with the wet ingredients. You'll see a dough forming—this is the fun part, I promise!
-
Chill your dough. Wrap it in plastic and let it hang out in the fridge for 30 minutes .
-
Afterwards, when the dough is all chilled and firm, roll it out to about ¼ inch thick. Now comes the fun part: cut out your Hello Kitty shapes!
-
Bake these beauties for about 10- 12 minutes or until you see the edges get just a hint of golden.
Pro tip: don’t forget to let them cool before you dive into decorating!
Expert Techniques
Now that your cookies are out of the oven, let's talk about that royal icing. it’s a game changer! combine 2 cups of powdered sugar with either 1 egg white or 2 tablespoons of meringue powder and a little bit of water—mix until it's smooth.
This is your canvas for creativity!
If you want to avoid common pitfalls, here’s my advice: cool those cookies completely before icing. no one wants a melted icing disaster! and when using food coloring, remember that it’s easier to add than take away—make gradual adjustments.
Success Strategies
Okay, before we wrap it up, let's talk success! one of the biggest mistakes is not chilling the dough enough—it makes those shapes tougher to cut out.
Also, pay attention to your cooking time. ovens can vary, so check them a minute or two early to avoid crispy edges.
For quality assurance, taste-test a cookie (approach with caution; they may not survive decoration)! if they hold up to quality control, you’re golden.
And if you're feeling prep-savvy, you can always make the dough ahead of time and freeze it for future fun baking projects.
The Sweet Joy of Baking!
And there you go! the union of those buttery vanilla cookies and festive cookie designs will have everyone squealing with delight.
With all these steps and tips, you'll be well on your way to baking up a storm with those cute cookie decorating ideas.
Whether it's for a holiday cookie baking party or a fun kids baking recipe session, hello kitty themed treats are bound to impress.
So grab your cookie cutter designs, let the memories unfold in the kitchen, and get ready for some joyful cookie decorating.
Because after all, when it comes to sweet treats for celebrations, a little creativity goes a long way. let’s keep that oven warm and roll into some additional information on how you can up your cookie game!

Let’s Elevate Those Hello Kitty Cookies!
Alright, friends! if you're diving into the world of baking with an aim to bake hello kitty cookies for sweet joy , you’re in for a delightful treat.
These cookies are perfect for kids and grown-up fans alike. but before we get our hands floury, let's chat about some pro tips & secrets to help you nail it!
Pro Tips & Secrets
First things first, the dough ! it’s a breeze to whip up those buttery vanilla cookies , but chilling the dough for about 30 minutes is a game changer.
Seriously, it makes the whole cookie-cutting process smoother. if you’re feeling fancy, you might want to try royal icing techniques to decorate your cookies.
Just remember, a steady hand and a little patience are key. oh, and if you make too much icing? no biggie! it can hang out in the fridge for about a week.
Now, for my time-saving technique : set up a cookie assembly line. You can roll, cut, and bake all in one go—talk about efficiency! And flavor enhancement? Adding a bit of lemon zest to your dough can give it that extra pop!
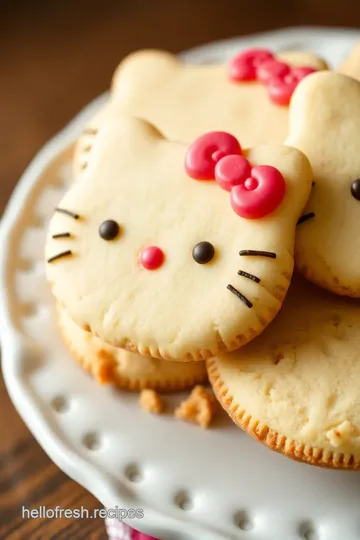
Perfect Presentation
Once your hello kitty cookies are baked, it's decorating time! when it comes to plating techniques , a simple white plate can really make those colorful cookies pop! go wild with garnish ideas like edible glitter or rainbow sprinkles.
A splash of color always gets that festive vibe going! if you’re planning for a birthday or event, matching color combinations can take your creativity to the next level.
Trust me, a well-presented cookie is a cookie that’s meant to shine!
Storage & Make-Ahead Magic
If you find yourself with a batch (or two) of these adorable cookies, you’ll want to store them right to keep ‘em fresh.
Just pop them in an airtight container—like tupperware—with a slice of bread. that little piece of bread will keep the cookies soft.
It's magic! and if you’re looking at a busy schedule, you can always make the dough ahead of time. chilled cookie dough can sit in the fridge for up to a week or it can be frozen for a month.
Just remember, when you want to use it, let it sit out for a bit before rolling.
Creative Variations
Feeling adventurous? i got your back! you can easily swap out flavors—how about chocolate chip hello kitty cookies ? just toss in some chocolate chips, and boom! you’ve got a new flavor twist.
Or if you’re trying to be a bit healthier, you could use coconut sugar for your icing instead of standard powdered sugar.
Let's not forget seasonal fun—the fall brings pumpkin spice, while summer’s ripe for fruity flavors!
Complete Nutrition Guide
When you're baking up kids baking recipes , it’s smart to keep an eye on those nutritional information for cookies .
Each cookie packs in around 150 calories, so maybe you can sneak in a bit more of that wholesome stuff, like nut flour or gluten-free options.
A little creativity can go a long way when you're thinking about dietary considerations .
Expert FAQ Solutions
Got questions? a few common ones pop up when people are baking. “why did my cookies spread too much?” that’s a dough temp issue—make sure it's chilled enough! if your cookies are too hard, it's likely you overbaked them, so keep an eye on those edges.
Now, feeling pumped to whip up these Hello Kitty themed treats ? These cookies aren’t just for lunchboxes; they’re incredible for baking parties for children or holiday cookie baking!
Wrapping It Up!
So, there you have it—a delicious dive into the world of bake hello kitty cookies for sweet joy . with these tips, tricks, and variations in your toolkit, you’ll be a cookie-making rock star in no time! so rally the kids or get your friends over for a fun baking project.
Remember, cookies are about joy, so decorate freely and don’t be afraid to get a little messy! happy baking—now let’s make some sweet memories!
Bake Hello Kitty Cookies for Sweet Joy Card

⚖️ Ingredients:
- 2 ¾ cups all-purpose flour
- 1 teaspoon baking powder
- ½ teaspoon salt
- 1 cup unsalted butter, softened
- 1 cup granulated sugar
- 1 large egg
- 1 teaspoon vanilla extract
- 2 cups powdered sugar
- 1 egg white or 2 tablespoons meringue powder
- 2-3 tablespoons water
- Food coloring (pink, yellow, black, etc. as desired for decoration)
- Sprinkles or edible glitter (optional)
🥄 Instructions:
- Step 1: In a bowl, whisk together flour, baking powder, and salt.
- Step 2: In a separate bowl, cream together the softened butter and granulated sugar until light and fluffy.
- Step 3: Beat in the egg and vanilla extract until combined.
- Step 4: Gradually add dry ingredients to the wet mixture, mixing until a dough forms.
- Step 5: Divide the dough into two discs, wrap in plastic, and chill in the refrigerator for at least 30 minutes.
- Step 6: Preheat your oven to 350°F (175°C) and line baking sheets with parchment paper.
- Step 7: Roll out chilled dough to about ¼-inch thickness. Use the Hello Kitty cookie cutter to cut out shapes.
- Step 8: Place cookies on the prepared baking sheets and bake for 10-12 minutes or until the edges are lightly golden.
- Step 9: Allow cookies to cool on the sheets for a few minutes before transferring to a wire rack.
- Step 10: In a mixing bowl, combine powdered sugar, egg white or meringue powder, and water. Mix until smooth.
- Step 11: Adjust consistency with water as needed.
- Step 12: Divide icing into bowls and color as desired. Use piping bags to decorate the cookies.
Previous Recipe: Delicious Sizzling Tex-Mex Chicken Skillet Delight: An Easy Weeknight Winner!
Next Recipe: Easy Sweet Hello Kitty Pasteles in 50 Minutes: A Fun Baking Adventure!