Sweet Hello Kitty Pasteles Recipe
Curious about baking sweet Hello Kitty pasteles? Join me as I share my simple tips and delightful experiences to bake these adorable pastries in 50 minutes!

Have you ever felt the joy that comes from baking something colorful and cute? i know i have! just the other day, i decided to bake sweet hello kitty pasteles in 50 minutes .
My kitchen was flooded with smiles, and i couldn't help but think back to my childhood. remember those days when everything seemed a little more whimsical? these hello kitty recipes definitely brought that magic back! with vibrant colors and sweet cream cheese fillings, they are sure to light up any kid’s face.
Plus, they’re super fun for adults too. honestly, who doesn't love a little nostalgia wrapped in flaky pastry?
Recipe Overview
So where do these adorable pastel recipes come from? well, they’re inspired by the beloved hello kitty character. while hello kitty originally hails from japan, her charm has spread like warm butter on toast across the globe.
Nowadays, these pastries are popular at birthday parties, tea gatherings, and for any day that calls for a little extra cheer.
Trust me, they never go out of style!
Time-wise , you're looking at around 50 minutes from start to delicious bite. difficulty level? i’d say it’s medium. sure, there’s a bit of artistry involved in making hello kitty’s cute little face, but i believe anyone can tackle it with a tad bit of patience! and as for cost? you won’t break the bank.
Most ingredients are pantry staples, so you can whip these up without burning a hole in your wallet.
Key Benefits
Now, let’s dive into the benefits of these adorable pastries. first off, pack them with nutritional highlights ! the cream cheese adds a nice dose of protein, while choosing a fruity filling gives a refreshing twist.
You can even sneak some fruit into the mix, making them the perfect fruit-filled pastries .
The notable feature of these hello kitty pasteles? let’s be real: they’re just plain cute pastries for kids ! they’re perfect for themed parties and will leave a lasting impression.
Plus, they sit pretty with a cute food presentation that'll make your guests go, "aww!"
And when it comes to advantages, these pasteles have the upper hand over similar recipes. the combo of flaky dough and creamy filling? pure bliss! imagine sinking your teeth into one of these delights, with a little burst of fruit flavor alongside the smoothness of cream cheese.
Trust me, they’re a game changer in your baking adventures.
If you’re new to baking or want to engage with your kids, making these hello kitty treats is an excellent choice.
They transform the kitchen into a playground! and once you master these, you'll find yourself dreaming up even more unique dessert ideas .
Ready to gather your ingredients? Let's get started on this fun baking project that’ll turn your kitchen into a delightful pastry factory!
Essential Ingredients Guide: Unlocking Your Kitchen Magic
Alright, foodie friends, gather around! today, we’re diving into an essential ingredients guide . whether you’re whipping up some hello kitty recipes or just trying to nail those cute pastries for kids , knowing your ingredients inside and out is a game-changer.
So let’s get rollin'!
Premium Core Components
First off, let’s talk about those premium core components . Here’s what you need to know:
-
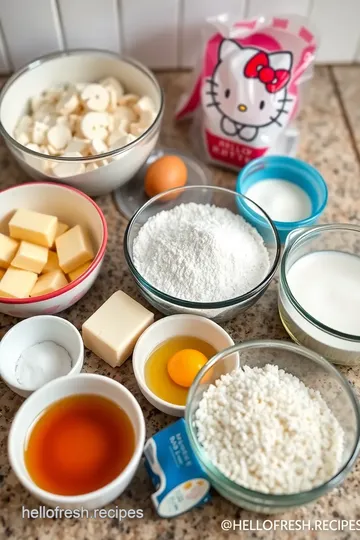
Measurements: You’ll want to get cozy with your measuring cups. For our pasteles, that means 2 cups of all-purpose flour (240g) . Precision is key in baking, ya know?
-
Quality Indicators: Fresh ingredients are crucial. Check your flour for a sweet nutty smell, and for butter, it should be perfectly cold and not too soft.
-
Storage guidelines: keep your flour stored in a cool, dark place, and butter? well, it’s best in the fridge. most things can last a while, but butter usually sits around for about 1-3 months before it goes off.
-
Freshness Tips: Always look for freshness dates on your ingredients. A good rule of thumb? Smell test! If it smells funky, toss it out!
Signature Seasoning Blend
Now, let’s sprinkle in some flavor! A signature seasoning blend you won’t want to miss:
-
Essential Spice Combinations: Think cinnamon for sweet pasteles or a pinch of nutmeg if you're feeling fancy!
-
Herb Selections: Fresh rosemary or thyme can brighten up many savory dishes. But for our Hello Kitty treats? Stick to vanilla and maybe cute pastel-colored sprinkles!
-
Flavor Enhancers: A little vanilla extract goes a long way. It’s like toasting marshmallows in your childhood—brings back memories!
-
Regional Variations: If you want to give your pasteles a twist, why not try a touch of lemon zest or even coconut flakes for that tropical flair?
Smart Substitutions
You know those moments when you don’t have what the recipe calls for? It’s okay! Here’s where smart substitutions come in handy:
-
Common Alternatives: No cream cheese? Go for mascarpone or cottage cheese. It's all about thinking outside the box!
-
Dietary Modifications: Need dairy-free? Almond cream can work wonders. And if you’re going gluten-free, check out those awesome flour blends on the market!
-
Emergency Replacements: Out of eggs? That’s cool! You can use mashed bananas or applesauce instead.
-
Seasonal Options: If certain fruits are out of season, frozen fruit jam can be a lifesaver. Baking with fruit jam is both easy and delicious.
Kitchen Equipment Essentials
And let’s not skip over those kitchen equipment essentials . Here’s what you really need:
-
Must-Have Tools: A good mixing bowl is a must. And don’t sleep on the rolling pin! It’s your best buddy when making dough.
-
Alternative Equipment Options: No cookie cutters? Use a glass! It’s not fancy, but it gets the job done, and you can turn it into a fun 🍒 art project!
-
Preparation Tips: Always have your ingredients pre-measured. It saves time and spills!
-
Storage Solutions: Use clear containers for your ingredients—it’s a nice way to see what you’ve got at a glance!
So there you have it! With a little prep and the right ingredients, you're well on your way to creating delicious sweet treats! Trust me, once you know the tricks of the trade, you’ll be ready to Bake Sweet Hello Kitty Pasteles in 50 Minutes and impress everyone at your next themed party treats event! Get excited, because we’re about to step into the delicious part—stay tuned for my favorite instructions coming up next!
Professional Cooking Method: Making Sweet Hello Kitty Pasteles in 50 Minutes
So, you’ve decided to dive into the world of diy hello kitty treats , huh? get ready, because these sweet hello kitty pasteles are not just adorable; they're downright delicious too! let’s go through some essential preparation steps before we jump into baking.
You’ll be whipping these cute pastries up in no time, so let's set the stage!
Essential Preparation Steps
First off, mise en place is key. this fancy french term just means having everything in place before you start.
Measure out your 2 cups all-purpose flour and your 1/2 cup chilled unsalted butter ahead of time. seriously, it’s a game changer!
Next, good ol' time management comes into play. you’ll want to dedicate about 15 minutes for active prep and another 10 minutes for assembly .
Plus, you can multitask while the dough chills. always nice to maximize efficiency!
Keep your workstation organized . A clutter-free space helps when you’re rolling out the dough and cutting those cute Hello Kitty shapes. Trust me; it makes a big difference!
And let’s not forget about safety. always handle your kitchen tools with care! watch out for sharp knives and hot ovens.
We want those colorful baked goods to shine but not at the expense of our fingers!
Step-by-Step Process
Ready to get your hands floury? Here we go:
-
Prepare the dough : mix flour, sugar, and salt in a bowl. cut in the butter until it resembles crumbs.
Add one large egg and gradually mix in cold water until the dough forms. wrap that baby in plastic wrap and refrigerate for 20 minutes .
-
Make the filling : in another bowl, beat 8 oz cream cheese with 1/4 cup powdered sugar and 1/2 teaspoon vanilla extract until smooth.
Now, stir in 1/2 cup fruit jam (your choice!). this filling is the magic moment for those sweet pastries ideas.
-
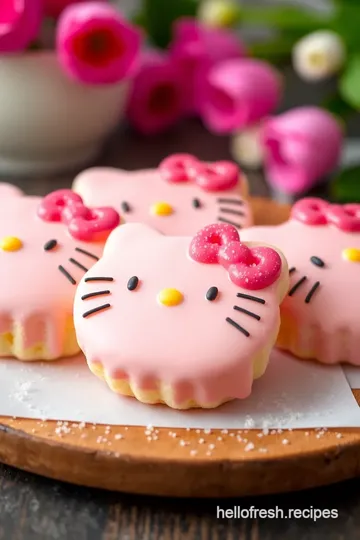
Assemble the pasteles : preheat your oven to 350° f ( 175° c) . roll out the dough and cut large circles for the heads of our hello kitties.
Top them with a tablespoon of that luscious filling, then add smaller shapes for the features.
-
Bake : Place on a parchment-lined baking sheet, brush with egg wash for a shiny finish, and pop them in the oven for 20- 25 minutes or until they're golden brown—golden means yum!
-
Cool and Garnish : Let your pasteles cool on a wire rack for about 5 minutes before decorating. Once cool, unleash your artistic side with some edible food coloring to make those cute facial features pop!
Expert Techniques
Here’s where we add some finesse. when mixing those dough ingredients, be careful not to overwork it. you want a flaky texture! for heat, keeping an eye on that oven temperature is essential.
You don’t want your pastel turning into a sad, burnt snack.
And hey, avoid filling them too much! A tablespoon is perfect. Otherwise, they could burst out during baking. Save the aesthetic for that cute food presentation !
Success Strategies
Alright, let's talk common mistakes. the first thing to remember: don’t skip chilling your dough! it’s a key step for flaky textures.
Another one—measure your ingredients correctly. it sounds simple but trust me; precision is everything in baking.
As for quality assurance , always check for doneness by gently pressing them; they should be firm but not hard. And yes, keep a close watch around the 20-minute mark .
Thinking ahead? You can prep the dough a day in advance and leave it in the fridge. You’ll thank yourself later when you can just roll it out and bake those sweet pasteles when the craving hits!
There you have it—in just under 50 minutes , you’ll be biting into your very own Hello Kitty pastel ! Perfect for a kid's party or an afternoon tea treat.
Now, if you're itching for more tips on how to master this whimsical dessert or want to dig into other themed baking projects , stick around for the next section: additional information.
. happy baking, friends!

Sweet Hello Kitty Pasteles: A Baking Adventure!
Oh my gosh, have you ever wanted to bake sweet hello kitty pasteles in 50 minutes ? seriously, these little cuties are the perfect way to bring a smile to everyone’s face.
Inspired by that adorable character we all love, these sweet pastries are filled with a dreamy combination of cream cheese and your favorite fruit jams.
Perfect for a kids' birthday party or a whimsical afternoon tea, these pasteles are as fun to look at as they are to eat!
Pro Tips & Secrets for Success
Here’s the scoop: baking Hello Kitty treats doesn’t have to be a chore . Let’s keep it fun and easy!
-
Chill Out! No, I’m not talking about being cool. Make sure to chill your dough before rolling it out. It helps keep the flaky texture we all crave.
-
Keep It Simple: If you're short on time, skip detailed designs. A cute pastel shape still looks fabulous!
-
Flavor Boost: Want to kick up the taste? Mix a hint of citrus zest into your cream cheese filling. Hello, flavor party!
-
Presentation is Key: When it comes to plating and garnishing, play with colors! A splash of pink and yellow food dye makes those Hello Kitty features pop.
Perfect Presentation for Festive Appeal
You know what they say: we eat with our eyes first! So let’s make these pasteles drop-dead gorgeous.
-
Plating Techniques: Try to stagger the pasteles on a cake stand or colorful platter. Making them pop against a plain background draws the eye right in.
-
Garnish Galore: Edible glitter or tiny sprinkles can make these pastries feel super extra for a themed party.
-
Color Combinations: Use pastel colors for decoration to match Hello Kitty’s aesthetic. Soft blues, pinks, and yellows are absolute winners.
Storage & Make-Ahead Magic
So you made a big batch of these beauties and have some leftovers? No problem!
-
Storage Rules: Keep your sweet pastries in an airtight container in the fridge for up to 3 days.
-
Reheating Hacks: Pop them in the oven for a few minutes to get that flaky pastry love back. Microwaving them can sog things up, you know?
Creative Variations to Razzle-Dazzle
Feeling adventurous? Here are some fun ideas to switch it up!
-
Flavor adaptations: Switch out fruit jams for chocolate hazelnut goodness. Yup, you read that right.
-
Dietary Mods: Try making gluten-free pasteles with a blend of almond flour and coconut flour. Yummy!
-
Seasonal Twists: Add pumpkin spice to your filling around autumn—Sweet Hello Kitty truly knows how to celebrate the seasons.
Complete Nutrition Guide
Let me tell you, balance is key! each pastel has about 210 calories . they’re a treat, but filled with cream cheese goodness and fruit, they bring a little joy to your tastebuds.
Just remember, moderation is your friend!
Expert FAQ Solutions
Okay, maybe you're thinking, “What if I mess this up?” Don't worry! Here's the deal:
-
Common Questions: If your pasteles aren’t flaky enough, you might’ve rolled the dough too thin. Keep it thick for that great texture.
-
Success Tips: Measure your ingredients carefully; baking is a science, but you can have fun with it!
-
Creative Variations Explained: If using different fillings, just think about how flavors work together. Try pairing chocolate with orange zest—it can be divine!
Wrapping This Up with Encouragement
So there you have it, my friend! ready to dive into the world of cute pastries for kids ? making these sweet hello kitty pasteles is a fantastic way to bond with your little ones, or even show off at the next potluck.
Don't stress! enjoy the process, have fun decorating like crazy, and remember to keep it playful. after all, baking should be a joyful experience! grab your hello kitty baking tools and let the good times roll.
Happy baking!
Sweet Hello Kitty Pasteles Recipe Card

⚖️ Ingredients:
- 2 cups all-purpose flour (240g)
- 1/2 cup unsalted butter, chilled and cubed (115g)
- 1/4 cup granulated sugar (50g)
- 1/2 teaspoon salt
- 1 large egg (50g)
- 3-4 tablespoons cold water (45-60ml)
- 8 oz cream cheese, softened (225g)
- 1/4 cup powdered sugar (30g)
- 1/2 teaspoon vanilla extract (2.5ml)
- 1/2 cup fruit jam (strawberry, raspberry, or your choice) (120g)
- Edible food coloring (pink, yellow for details)
🥄 Instructions:
- Step 1: Combine flour, sugar, and salt in a mixing bowl.
- Step 2: Cut in chilled butter until crumbly.
- Step 3: Mix in the egg and add cold water gradually until a dough forms.
- Step 4: Knead gently, wrap in plastic, and refrigerate for 20 minutes.
- Step 5: In a separate bowl, beat softened cream cheese with powdered sugar and vanilla extract until smooth.
- Step 6: Mix in the fruit jam of your choice until combined.
- Step 7: Preheat the oven to 350°F (175°C).
- Step 8: Roll out the dough on a floured surface.
- Step 9: Cut large circles with a cookie cutter and smaller shapes for Hello Kitty features.
- Step 10: Place a tablespoon of filling on each larger circle, then place smaller cutouts on top to create a face.
- Step 11: Arrange pasteles on a parchment-lined baking sheet.
- Step 12: Brush with egg wash (optional for shine) and bake for 20-25 minutes or until golden.
- Step 13: Allow pasteles to cool for 5 minutes on a wire rack.
- Step 14: Decorate with edible food coloring for facial features after they cool completely.
Previous Recipe: How to Bake Hello Kitty Cookies for Sweet Joy: 5 Delightful Tips
Next Recipe: How to Make Amazing Fried Chicken with Crispy Flavorful Coating