Delicious Cake Pops with Hello Kitty Charm
Looking for a fun baking project? These Delicious Cake Pops with Hello Kitty Charm are adorable and sure to delight kids and adults alike! You'll love the colorful twist!

- Let's look into into Delicious Cake Pops with Hello Kitty Charm!
- A Whirlwind of Flavor and Fun
- Why You’ll Love These Colorful Cake Pops
- Ready to Gather Your Ingredients?
- Essential Ingredients Guide
- Signature Seasoning Blend
- Smart Substitutions
- Kitchen Equipment Essentials
- Mastering the Art of Professional Cooking: A Beginner’s Guide
- Pro Tips & Secrets for Cake Pop Perfection
- Perfect Presentation for Your Delicious Cake Pops
- Storage & Make-Ahead Magic
- Creative Variations to Elevate Your Cake Pops
- Complete Nutrition Guide for Your Hello Kitty Cake Pops
- Expert FAQ Solutions for Worry-Free Baking
- Conclusion: Get Baking!
- Recipe Card
Let's look into into Delicious Cake Pops with Hello Kitty Charm!
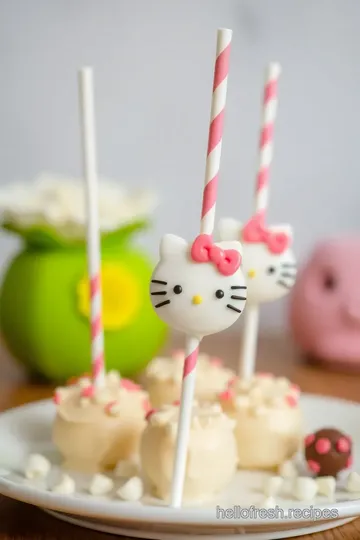
Alright, y’all! gather ‘round because i’ve got an adorable treat that’s bound to spark joy at your next gathering or just-because moment: delicious cake pops with hello kitty charm .
Picture this: it’s a sunny saturday afternoon, and the kids are crawling up the walls, looking for something to do.
Suddenly, my brain goes, “cake pops!” yeah, you heard me right. quick, cute, and crazy fun to make!
Do you remember the first time you baked with your parents? that blend of mess and bonding? that’s the vibe you’ll get with these hello kitty cake pops.
Seriously, each bite is a trip back to the good ol’ days and they’re like edible treasure chests filled with happiness!
A Whirlwind of Flavor and Fun
So, why hello kitty, you ask? this little feline is more than just a cute face; she’s an icon! originating from japan in the '70s, hello kitty has taken over the world, one adorable product at a time.
And now, we are snagging her charm for our cake pop creations. these are not just your average cake pops; they’re hello kitty themed desserts that are perfect for parties, especially for a hello kitty birthday party!
Now let’s talk about how easy this is. difficulty level? medium. but trust me, if i can do it, so can you! you’re looking at about 2 hours total from start to finish.
I mean, figuring this out took me a good few tries, but once i nailed it, let’s just say it became my go-to for kids' baking recipes and gatherings.
When it comes to cost, these pops will fit your budget nicely! You’re spending around 15 bucks for a batch of 12-15 pops. Not too shabby for making smiles!
Why You’ll Love These Colorful Cake Pops
Alright, hold onto your whisk because there’s so much to love about these little gems! first up, let’s talk health.
Now, i’m not saying you should swap your salad for cake pops (that’s definitely not happening!), but hey, making them at home means you control the ingredients.
Want to go gluten-free? easy peasy! feeling adventurous? try vegan options with flaxseed instead of eggs. diy dessert ideas for all!
Secondly, these pops aren’t just for birthdays. they’re great for celebrations of any kind—baby showers, holidays, or just a fun treat for after school snacks.
Plus, the decorative cake pops can be dressed up or down. you can go bananas with sprinkles or keep them cute and simple.
And the best part? everyone loves them! i find they are easier to serve and cleaner than traditional cake. no need for forks, and they’re the ultimate finger food for parties.
Perfect for those who want to indulge without the mess!
Ready to Gather Your Ingredients?
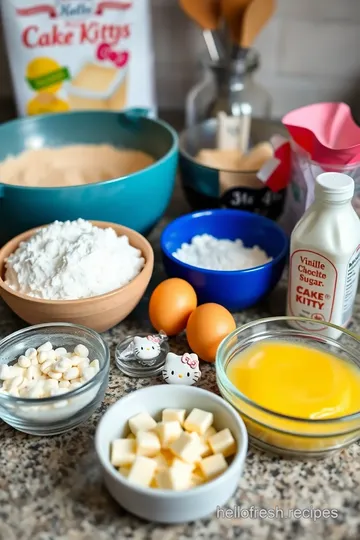
Before we get down to the nitty-gritty of how to make these cake pops, let me tell you, you’re gonna need a few things: flour, sugar, some butter, and of course, white chocolate coating! we’re just getting started here, so make sure you’re stocked up on things like edible decorations and lollipop sticks.
Trust me, these pops are going to win over hearts and taste buds alike!
So, are you ready to spread some Hello Kitty magic? Grab your aprons, and let’s whip up these adorable cake pops that will surely be the life of the party! Get ready for an easy cake pops tutorial that will make both kids and adults squeal with delight!
Essential Ingredients Guide
When it comes to making those adorable hello kitty cake pops , the right ingredients can make all the difference between a cute treat and a delicious sensation .
Let’s break it down into bite-sized pieces, shall we?
Premium Core Components
First things first, let's chat about the essential ingredients to get you on your way to creating delightful cake pops for celebrations .
Baking Basics:
- All-Purpose Flour: You’ll need 1 cup (125 g) . It’s the backbone of your cake – fluffier means happier, right?
- Granulated Sugar: Grab 1/2 cup (100 g) . This sweetness will balance your flavors.
- Baking Powder: This is your little magic dust – 1/2 teaspoon will help lift the cake.
- Salt: Just 1/4 teaspoon will enhance everything, trust me!
- Whole Milk: Use 1/4 cup (60 ml) . It keeps everything moist.
- Unsalted Butter: You’ll need 1/4 cup (60 g) , melted. It’s like a hug for your cake.
- Vanilla Extract and Egg: Essential party guests, so don’t skip out!
Quality Indicators for Each Ingredient
When you're out shopping, look for high-quality chocolate coatings for that added creaminess. For vanilla extract, nothing beats the real stuff over imitation. Your taste buds will thank you!
Storage Guidelines and Shelf Life
Store your cake pops in an airtight container in the fridge for up to one week . this ensures every bite remains a delightful surprise! if you're saving the pops for later, consider freezing them.
Just be sure to wrap them well!
Freshness Tips and Selection Criteria
When picking your ingredients, especially dairy, always check the sell-by dates . fresh butter and eggs will keep your cake pops moist and tasty.
And, honestly, there’s nothing worse than a dry dessert , am i right?
Signature Seasoning Blend
Now let’s sprinkle in a pinch of flavor.
Essential Spice Combinations
While cake pops don’t typically need spices, think about adding a dash of cinnamon or even a hint of nutmeg to your cake batter for a warm touch.
Herb Selections and Pairings
This isn’t your garden salad, but if you’re feeling adventurous, consider a hint of mint in your frosting. It’s a fun twist that no kid (or adult!) would see coming!
Flavor Enhancers and Aromatics
Using a splash of almond extract can elevate your cake pops. It’s a surprising flavor boost and pairs wonderfully with vanilla.
Regional Variations and Alternatives
Feeling festive? Switch it up for a pumpkin spice cake pop in the fall! Use pumpkin puree in your batter and a sprinkle of cinnamon.
Smart Substitutions
Have you ever been in the middle of a recipe and realized you’re missing an ingredient? Yep, we’ve all been there. Here's how you can keep calm and carry on baking!
Common Alternatives
Out of butter ? You can easily substitute with coconut oil or apple sauce for a healthier option. Not highly recommended for cakes but can work in a pinch!
Dietary Modifications
Making vegan cake pops ? Simply swap out the egg for flaxseed meal mixed with water. Seriously, it works!
Emergency Replacements
If you find yourself out of frosting , cream cheese mixed with a bit of sugar can work wonders. Don’t panic, just improvise!
Seasonal Options
Berries in the summer? Top your cake pops with fresh strawberries for a vibrant touch. Seriously, colorful cake pops are a feast for the eyes!
Kitchen Equipment Essentials
Before you dive into your Hello Kitty themed desserts , let’s make sure your kitchen is ready!
Must-Have Tools
You’ll need basic items like mixing bowls , a whisk , and, of course, a baking pan . A food processor is handy for crushing cake crumbs.
Alternative Equipment Options
No lollipop sticks? You can opt for pretzel sticks for a fun twist. Just make sure they’re sturdy enough!
Preparation Tips
Always have your ingredients at room temp; this helps everything mix evenly.
Storage Solutions
Keep your baking essentials organized. It saves you time and minimizes that “where did I put the flour?” moment!
And just like that, you’re all set to whip up some delicious cake pops with hello kitty charm ! grab your ingredients and let's head into the fun part—making these delightful treats! cooking should be a blast, filled with laughter and creativity.
Now, let's dive into the step-by-step instructions so you can impress your friends and create those adorable cake pops that'll be the highlight at every gathering!
Mastering the Art of Professional Cooking: A Beginner’s Guide
So, you're diving into the world of professional cooking? that's awesome! it can seem overwhelming at first—like trying to solve a rubik's cube blindfolded.
But seriously, with the right steps and methods, you can whip up some professional-quality dishes, including some super cute hello kitty cake pops ! let’s break it down into bite-sized bits.
Essential Preparation Steps
Mise en place: the french secret
"mise en place" just means “everything in its place.” before you start cooking, gather your ingredients and tools.
This helps keep the kitchen organized and makes it easier to follow your recipe. you don't want to be scrambling for that baking powder while guacamole is running off the cutting board!
Time management: the chef's life
you know what they say, "a watched pot never boils." but trust me, when you're baking those hello kitty themed desserts , timing is key! keep an eye on your clock.
Allocate time for each step, and factor in just a little extra for the curveballs life may throw your way.
Stay organized
clearing your workspace and putting completed items away will help keep you focused. it might sound tedious, but if you finish with a clean kitchen, you’ll feel like an absolute rock star.
Safety First
Don’t forget about safety. Always use oven mitts, and practice knife safety. And if you’re using those adorable cake pops sticks, keep them away from kids unless supervised!
Step-by-Step Process
Ready to slap on your apron? Here’s the step-by-step route to mastering those cake pops.
-
Preheat the Oven : First things first, crank that oven up to 350° F ( 175° C) . Or whatever temperature your recipe dances to!
-
Bake the Cake : Mix your luscious cake batter—it should bake for about 25 minutes . You want it golden brown on top and a toothpick should come out clean.
-
Cool It Down : Once it’s out, let it cool for 10 minutes and then for an additional 30 minutes on a rack. Patience pays off here!
-
Create Cake Crumbs : Crumble your cooled cake into fine pieces. You want this to blend well with frosting later.
-
Whip Up Frosting : Mix your cream cheese, powdered sugar, and a dash of vanilla until smooth.
-
Combine : Mix your crumbs with the frosting until it’s all incorporated. Roll them into balls about an inch wide.
-
Chill : Stick 'em in the fridge for 30 minutes to set.
-
Melt Chocolate : Use a microwave-safe bowl and melt your chocolate until it’s smooth.
-
Dipping Game On : Dip the tip of a lollipop stick into the chocolate. Insert into a cake ball then coat the entire thing. Pop these in some Styrofoam to set—patience again!
-
Decorate : This is the fun part! Use markers and mini chocolate chips to bring your Hello Kitty designs to life.
Expert Techniques
Let’s elevate your baking game a bit more!
-
Professional Methods : Use good quality chocolate—trust me, it makes a huge difference in flavor.
-
Quality Checkpoints : Always check for doneness by poking that toothpick. You’ll develop a feel for it over time!
-
Troubleshooting : If your cake pops are falling apart, you may need more frosting or to chill a bit longer. Don’t fret; it's all part of the learning process!
-
Perfect Results : For a colorful twist, play around with food coloring while melting the chocolate coating.
Success Strategies
Learning from mistakes makes you a better cook!
-
Avoid Common Pitfalls : Don’t rush. It’s easy to skip a step when you’re eager to get to the cute decorations.
-
Quality Assurance : Always taste your cake mix before rolling. If it’s not flavorful yet, that's your cue to tweak it.
-
Make-Ahead Options : You can prep the cake and frosting a day ahead. Just remember, keep them in the fridge!
-
Snack Ideas for Parties : These cute cake pops for celebrations are perfect for any kids' birthday party, or even as a sweet reward after a long week.
So, whether you’re creating festive cake pops or diving into creative cake pop designs , remember that practice makes perfect.
You’ll be surprising your friends with homemade desserts for kids in no time!
In the end, cooking is meant to be fun. Keep experimenting, making messes, and sharing your delicious creations. And for even more sweet treats, stay tuned for our next section: Additional Information!

Pro Tips & Secrets for Cake Pop Perfection
Oh my gosh, making Hello Kitty cake pops is such a fun way to combine baking and creativity! Here are some insider tips to help you nail those cute dessert recipes .
Chef's Personal Insights
First off, don’t rush the chilling process! after you form those little balls, give them at least 30 minutes in the fridge.
It makes dipping them in melted chocolate so much easier. you don’t want them falling apart, right?
Time-Saving Techniques
Also, if you’re short on time, consider using a boxed cake mix . it’s totally okay! just make sure to follow the baking directions on the box, and you'll still achieve that dreamy, moist base for your cake pops.
Flavor Enhancement Tips
Want to jazz it up? try adding a teaspoon of almond extract to the batter. it gives an amazing flavor boost without any extra effort.
You could also swap out some of that vanilla for something like orange zest or even peppermint for a holiday twist!
Presentation Advice
For a pro look, stand your pops in a styrofoam block while they set. it helps them keep their shape.
Plus, if you sprinkle some edible glitter or fun sprinkles on top while the coating is still warm, you’ll take those cake pops to a whole new level!
Perfect Presentation for Your Delicious Cake Pops
Let’s talk eye candy —literally! Presentation is half the fun with these Hello Kitty pops.
Plating Techniques
Arrange them on a cute platter and mix in some colorful fruit like strawberries or blueberries around the pops. This not only looks stunning but adds a refreshing touch.
Garnish Ideas
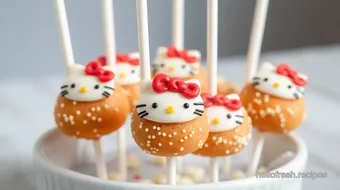
Use mini chocolate chips for Hello Kitty's eyes and a few small pink heart sprinkles for a nose—so adorable!
Color Combinations
Think bright! use pinks, yellows, and whites to make your pops pop. you can also use different colored candy melts to theme them up for various occasions.
How about some festive cake pops for the holidays?
Visual Appeal Tips
Stack them on top of each other for a fun display at birthdays or Hello Kitty-themed parties. Trust me; it’ll make your dessert table the star of the show!
Storage & Make-Ahead Magic
Now, let’s chat about how to keep those pops fresh!
Storage Guidelines
If you have leftovers, store your delicious cake pops in an airtight container. They’re best enjoyed within three days , but they’ll hold up for up to a week in the fridge.
Preservation Methods
You can also freeze them for later. just wrap each pop in wax paper, and pop ‘em into a ziploc bag.
When you’re ready for a treat, let them thaw in the fridge overnight.
Reheating Instructions
No need to reheat these babies, but if they get a little hard after freezing, just let them sit out for about 15 minutes before you dive in.
Freshness Duration
Honestly, the sooner you eat these sweet treats, the better! They’re best when fresh , but if they’re stored well, you can still enjoy them a week later.
Creative Variations to Elevate Your Cake Pops
Feeling adventurous? Let’s explore some fun tweaks!
Flavor Adaptations
Switch up that vanilla cake for chocolate cake pops . Just substitute the base, and boom—chocolate heaven!
Dietary Modifications
For those watching their gluten intake, swap regular flour with a gluten-free blend . And for my vegan friends, use flax eggs and non-dairy milk to create scrumptious vegan dessert options .
Seasonal Twists
As the seasons change, so can your flavors! How about pumpkin spice in the fall or peppermint during the winter? Adapting for the holidays can keep these treats exciting!
Regional Variations
Explore other cultures too! How about adding coconut for a tropical flair? Or infusing your coating with flavors like matcha for a Japanese twist? The world is your oyster!
Complete Nutrition Guide for Your Hello Kitty Cake Pops
Let’s keep it real: these are indulgent treats. But it's nice to know what’s in them!
Detailed Breakdown
Each pop contains about 150 calories with a dash of protein and some fats. They’re not exactly health food, but hey, they’re treats!
Health Benefits
In moderation, these pops can bring smiles! Plus, you could sneak in some sprouted flour for extra fiber and nutrients.
Dietary Considerations
Always consider your audience. Keep in mind food allergies and dietary preferences, like offering gluten-free cake pops or vegan options .
Portion Guidance
Stick to one pop per person at parties—it’s an easy way to keep portions in check. But I won’t judge if you grab a second. They're that good!
Expert FAQ Solutions for Worry-Free Baking
Have burning questions? Here’s what you need to know!
Common Questions
“What if my cake pops are too soft?” Don’t worry! Just pop them back in the fridge for a while until they firm up.
Troubleshooting Guide
If your coating cracks, try not overheating the chocolate next time. A little patience goes a long way!
Success Tips
Practice makes perfect. If your pops don’t turn out as expected, don’t be discouraged. Each batch teaches you something new.
Variations Explained
You can easily switch ingredients—like using buttercream instead of cream cheese icing. The world of cake pop decorating ideas is just bursting with potential!
Conclusion: Get Baking!
So there you have it! a comprehensive guide to creating delicious cake pops with hello kitty charm —the perfect blend of fun and flavor.
Whether you’re whipping these up for a hello kitty birthday party or simply to bring a smile to someone’s face, you can’t go wrong with these sweet treats.
Remember, it’s all about having fun and getting creative in the kitchen. so grab those baking supplies and let’s make some magic happen! 🥳
Delicious Cake Pops with Hello Kitty Charm Card
⚖️ Ingredients:
- 1 cup (125 g) all-purpose flour
- 1/2 cup (100 g) granulated sugar
- 1/2 tsp baking powder
- 1/4 tsp salt
- 1/4 cup (60 ml) whole milk
- 1/4 cup (60 g) unsalted butter, melted
- 1 large egg
- 1 tsp vanilla extract
- 1/2 cup (120 g) cream cheese, softened
- 1/4 cup (30 g) powdered sugar
- 1/2 tsp vanilla extract
- 12 oz (340 g) white chocolate or candy melts
- Food coloring (pink, yellow, and black)
- Sprinkles (optional)
- Lollipop sticks
- Edible markers (black and pink)
- Mini chocolate chips (for eyes)
🥄 Instructions:
- Step 1: Preheat the oven to 350°F (175°C). Grease and line the baking pan with parchment.
- Step 2: Combine flour, sugar, baking powder, and salt in a bowl. Whisk to blend.
- Step 3: In another bowl, mix milk, melted butter, egg, and vanilla. Combine wet and dry ingredients, mix until smooth.
- Step 4: Pour batter into the prepared baking pan and bake for 25 minutes or until a toothpick comes out clean.
- Step 5: Remove cake from the oven, allow to cool in the pan for 10 minutes, then transfer to wire rack until completely cool.
- Step 6: Crumble the cooled cake into a food processor until fine.
- Step 7: In a bowl, mix softened cream cheese, powdered sugar, and vanilla until smooth.
- Step 8: Combine crumbled cake with frosting, mixing until well incorporated. Form into balls about 1 inch in diameter.
- Step 9: Place cake balls on parchment paper and chill in the fridge for 30 minutes.
- Step 10: In a microwave-safe bowl, melt white chocolate until smooth. Add food coloring to desired color.
- Step 11: Dip the tip of a lollipop stick into the melted chocolate, insert into a cake ball, then dip the entire ball in the melted chocolate until fully coated.
- Step 12: Place dipped pops in Styrofoam to set. Decorate with edible markers and mini chocolate chips to create Hello Kitty designs.
Previous Recipe: Delicious Whisked Almond Milk Creamy Sauce Base: 5 Easy Secrets!
Next Recipe: How to Make Creamy Garlic Sauce in 5 Minutes: My Ultimate Go-To!