Southern Style Fried Chicken with a Crispy Flavorful Coating
Craving fried chicken? Dive into my kitchen-tested recipe for Fried Chicken with Crispy Flavorful Coating that’s bursting with flavor and easy to enjoy!

- The Heart of Southern Fried Chicken: A Crispy Delight
- Your Go-To Essential Ingredients Guide for Southern Fried Chicken
- Mastering the Art of Southern Style Fried Chicken
- Pro Tips & Secrets for the Best Fried Chicken
- Perfect Presentation
- Storage & Make-Ahead
- Creative Variations
- Complete Nutrition Guide
- Expert FAQ Solutions
- Recipe Card
The Heart of Southern Fried Chicken: A Crispy Delight
So, picture this. it’s sunday afternoon, and i’m at my aunt’s house. the air is thick with this delicious aroma.
And what’s that? fried chicken! oh my gosh, it’s like a warm hug for your stomach. that crispy exterior, juicy meat, and the spices that dance on your taste buds? yeah, that’s the magic of fried chicken with crispy flavorful coating .
I could eat that stuff all day long!
Isn’t it funny how certain foods can take you right back to those good times? i bet many of you have a similar memory tied to this southern comfort food.
Whether it was sunday dinners, family picnics, or good old backyard barbecues, southern fried chicken is a big deal. and you know what? it’s still a staple in homes across the country.
A Tasty Overview
Let’s dive into the good stuff! this recipe has deep roots in southern cuisine. it’s made its mark from soul food gatherings to those quick weeknight dinners.
Honestly, nothing beats that crunchy fried chicken sensation. the best part? you can whip it up without being a culinary genius! sure, achieving that perfect crispy fried chicken coating takes a little finesse, but with just a sprinkle of patience, you’ll be the star of your next gathering.
Now, what are we looking at timewise? well, you're looking at about 15 minutes of hands-on prep, 30 minutes in the fridge for the chicken to marinate , and 20- 25 minutes for frying .
This whole process will take around 1 hour and 10 minutes . it’s not quick microwave dinner, but trust me, it's totally worth every second.
As for cost, it's surprisingly friendly on the wallet! You can generally make enough chicken for about four hungry folks without breaking the bank. Perfect for those family nights!
Why This Recipe Rocks
Let’s talk health. we know fried foods aren’t always hailed as “health food,” but when you make it yourself, you control the ingredients.
A homemade buttermilk chicken marinade packs in flavor, plus, that tenderizing effect of buttermilk is a game changer. plus, using bone-in chicken gives you all that extra moisture.
Can you say "juicy perfection"?
Now, check this out: fried chicken isn’t just for casual tuesday nights. oh no, it shines at special occasions, too! you’re having a birthday bash, fourth of july cookout, or a family reunion? bring out that crispy chicken breading ! it’s the ultimate crowd-pleaser.
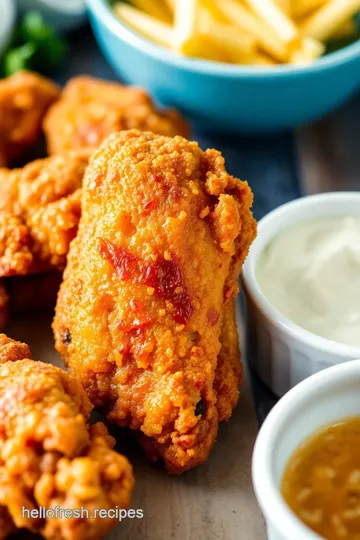
And don't get me started on those fried chicken serving ideas ! think southern-style picnic setups, complete with fresh coleslaw, cornbread, or even that homemade gravy for chicken .
Talk about unforgettable meals!
What makes this recipe even more special is the way it stands out from other fried chicken recipes. the combination of spices gives your taste buds a wild ride, while the frying techniques lock in moisture and flavor.
Seriously, those crunchy chicken recipes are great, but this one? it’s legendary!
Moving on to the Good Stuff
So, are you itching to whip up this delicious dish? perfect! we’re about to dive into the list of ingredients you’ll need.
Get ready to bring the heart of southern cooking into your own kitchen. trust me, once you taste that perfect fried chicken crunch , you’ll never look at takeout the same way again!
Now, gather your cooking gear and let’s make some chicken magic together!
Your Go-To Essential Ingredients Guide for Southern Fried Chicken
So, you’re ready to whip up some fried chicken with crispy flavorful coating ? oh my gosh, you’re in for a treat! let’s dive into the essentials you need to create that golden, crunchy goodness right in your own kitchen.
This guide is all about making your fried chicken dreams come true—because let’s be real, no one can resist a juicy piece of southern fried chicken!
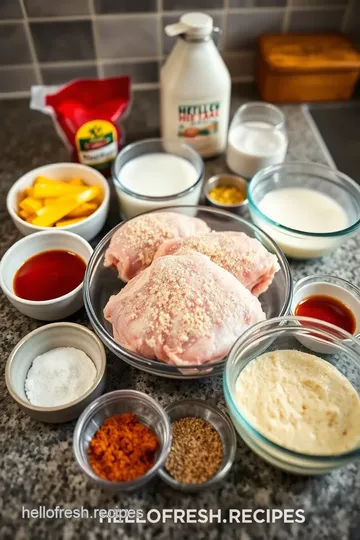
Premium Core Components
First things first, you’ll want to make sure you have quality ingredients . this isn’t just about grabbing anything off the shelf; it’s about choosing the best stuff for the task.
Here’s what you need:
-
Measurements : For your buttermilk fried chicken, you’ll need 1 cup (240 ml) of buttermilk, and trust me, it’s a game changer. If you’re in metric land, that’s about 240 grams .
-
Quality Indicators : Always look for fresh, bone-in chicken ; it gives you the juiciness and flavor that you can't get from boneless cuts. Check those expiration dates!
-
Storage guidelines : keep your buttermilk in the fridge after you open it, and try to use it within a week.
As for your chicken, keep it chilled and cook it up within a day or two if it’s fresh.
-
Freshness Tips : When picking chicken, look for a pink color with a little sheen. If it looks dull or gray, keep walking!
Signature Seasoning Blend
Now, we’re talking about the real secret sauce that takes your chicken to the next level.
-
Essential Spice Combinations : For that classic crispy fried chicken coating , you’re gonna need garlic powder, onion powder, paprika, and maybe even some cayenne if you’re feeling spicy!
-
Herb Selections : Fresh herbs like thyme or parsley can be a great addition. They pair wonderfully with your chicken and add that extra flavor kick.
-
Flavor Enhancers : Don’t forget the hot sauce in your buttermilk marinade. It adds depth and a little zing!
-
Regional Variations : Want to put a twist on it? Think about Southern-style sides like coleslaw recipes for fried chicken or homemade gravy for chicken, depending on your taste.
Smart Substitutions
Hey, we’ve all had those moments when you realize you’re missing an ingredient, right?
-
Common Alternatives : If you’re out of buttermilk, mix regular milk with a tablespoon of vinegar and voila! Instant buttermilk.
-
Dietary Modifications : For a gluten-free version, swap all-purpose flour for almond flour or a gluten-free blend.
-
Emergency Replacements : Use chicken thighs instead of breasts for a juicier bite. They also handle frying better!
-
Seasonal Options : If you can’t find certain spices, check your pantry for dried herbs—make it work with what you have!
Kitchen Equipment Essentials
Having the right tools can make or break your chicken frying experience.
-
Must-have tools : get yourself a heavy-bottomed pot or a deep fryer (it’s key for even frying). a cooking thermometer is essential for getting that oil temperature just right—350° f ( 175° c) is the magic number.
-
Alternative Equipment Options : Don’t have a fryer? A large cast-iron skillet works great too.
-
Preparation Tips : When dredging your chicken, use one hand for wet and one for dry—this keeps your hands from getting all gunky.
-
Storage Solutions : A wire rack to drain your chicken is a lifesaver—keeps it crispy instead of soggy.
Let’s not forget that after all this prep, you’ll want to know the nitty-gritty of getting those chicken pieces cooked just right.
Achieving that perfect fried chicken crunch is about mastering the right technique!
And speaking of techniques, now that we’ve covered those necessary ingredients and tools, are you ready to see how it all comes together in my foolproof recipe? Hang tight, because it’s time to get cooking and serve up some delicious fried chicken variations that your family will rave about!
Mastering the Art of Southern Style Fried Chicken
Oh my gosh, there’s just something about biting into a piece of southern style fried chicken with a crispy flavorful coating ! it brings you straight to a sunny backyard cookout or a family dinner where love is served on a platter.
If you want that delicious crunch and inner juiciness, let's dive into some professional cooking methods to get you that key comfort food just right.
Essential Preparation Steps
Now, let’s start with mise en place , aka, everything in its place. this french term boils down to having all your ingredients prepped and ready to go before you even turn on the stove.
For this recipe, that means measuring out your buttermilk, spices, and chicken pieces. it just makes everything easier.
Time management is your friend here. the bustling kitchen often leads to chaos when frying chicken. i’ve learned to take a moment, breathe, and think about the order of operations.
You’ll want to marinate your chicken ahead of time—ideally for at least 30 minutes (you can even go overnight!).
Oh, and organization? keep your workstation tidy. we’re not aiming for a cooking disaster! also, don’t forget about safety considerations , like using long tongs for frying and making sure your oil’s at the right temperature (that’s around 350° f , folks).
A hot oil splatter is no fun!
Step-by-Step Process
Alright, here’s where the good stuff happens. Let’s walk through some step-by-step instructions to keep things simple and effective:
-
Marinate your chicken : mix that buttermilk, hot sauce, garlic powder, onion powder, paprika, and cayenne in a big bowl.
Toss your chicken into that bath and let it soak up the flavor for 30 minutes to overnight .
-
Prepare Flour Mixture : In a shallow dish, whisk together flour, salt, and black pepper. Set it aside like a trusty sidekick.
-
Dredge and dip : pull the chicken from its buttermilk bath. let the excess drip off before dredging each piece in the flour mixture.
Seriously, press it down a bit for that crunchy coating to stick.
-
Heat the Oil : In a heavy-bottomed pot (or you know, your trusty deep fryer), get that oil up to 350° F . Use a thermometer, people!
-
Time to fry! : carefully drop your chicken pieces into the hot oil. practice patience—don’t overcrowd! you’ll want to cook for about 10- 12 minutes on the first side.
Once that golden brown goodness starts to show, flip and cook for another 8- 10 minutes until they hit that juicy internal temperature of 165° f .
-
Drain and chill : pop the chicken on a wire rack or layer on some paper towels to let it relax.
Seriously, let those pieces rest for 5- 10 minutes . it’s going to keep them juicy!
Expert Techniques
Now that we’ve got the basics, let’s chat about some expert techniques to take your chicken to the next level.
-
Quality Checkpoints : Make sure your coating is nice and thick. If you see any bare spots on your chicken, it’s a sign to dredge just a bit more!
-
Troubleshooting tips : if your chicken is browning too fast but isn’t cooked through, lower your oil temperature. remember to keep it steady at that 350° f mark! conversely, if the coating doesn’t seem crispy, you might need to cook it a tad longer or check the flour mix ratio.
Success Strategies
Want to avoid common mistakes? Here are some success strategies for you:
-
Avoid Soggy Coating : If your oil’s not hot enough, your chicken will drown in grease. Hence, the right oil temperature is key.
-
Perfect Results Guide : Letting your fried chicken rest not only keeps it flavorful but also retains its crunch.
-
Make-Ahead Options : If you have family gatherings or spoiling opportunities coming, consider frying in batches, keeping cooked pieces warm in the oven at 200° F while you finish up the lot.
And there you go! doesn’t that sound easy-peasy? with a southern fried chicken recipe like this one, you’re on your way to serving a dish that’s nothing short of a delightful chicken feast fit for gatherings.
Stay tuned because in the next part, we’ll dive into some additional information that might come in handy when you take your fried chicken adventures even further!
Pro Tips & Secrets for the Best Fried Chicken
Okay, let’s dive into the juicy details of getting your fried chicken with crispy flavorful coating just right. we've all had that moment where the chicken looks perfect coming out of the oil but falls flat on flavor or texture.
So, let’s keep it real with some honest tips gathered from my own kitchen trials.
Chef's Insights
One of the biggest game changers for me was when i started using a buttermilk chicken marinade . the tangy buttermilk not only tenderizes the chicken but also infuses it with flavor, making every bite a pure delight.
Honestly, if you’ve never marinated your chicken before frying, you’re missing out!
Time-Saving Techniques
Ever heard of double dipping? after the first round of dredging in the flour, dip it back into that buttermilk, then into the flour again.
This gives you that coveted crispy fried chicken coating . plus, while the chicken is resting, why not whisk some up a quick homemade gravy for chicken or whip together some coleslaw recipes for fried chicken ? you’ll thank me later!
Flavor Enhancement Tips
Let’s not forget the seasoning! throw in some spicy fried chicken seasoning —trust me, a little cayenne goes a long way.
You can even make it your own by adding spices like garlic or onion powder… or whatever floats your boat! i mean, spice it as you like, but just remember: start small.
You can always add more!
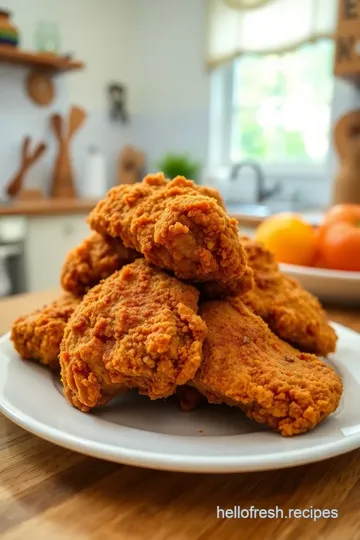
Presentation Advice
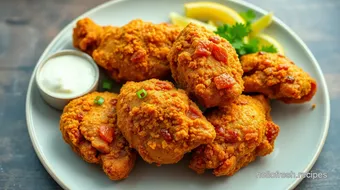
Alright, friends, let’s talk presentation. there’s nothing quite like serving up your fried chicken in style. arrange the pieces on a beautiful platter with vibrant sides like cornbread or collard greens .
A sprinkle of fresh parsley or an additional dash of paprika right before serving adds a pop of color. hey, we eat with our eyes first, right?
Perfect Presentation
Plating Techniques
When plating, create height by stacking a few pieces of chicken on top of each other, maybe with a wedge of lemon or herb nestled in for that rustic touch.
It really brings the dish to life!
Garnish Ideas
Fresh herbs are your best friend. Think thyme or parsley! If you’re feeling extra, squeeze some lemon over the top right before serving for that zing.
Color Combinations
Contrast is key. Use colorful sides like vibrant coleslaw or roasted veggies to make that fried chicken pop. It’s all about balance!
Visual Appeal Tips
Lastly, take a moment to step back and admire your handiwork before diving in. snap a few pics for the ‘gram if you’re into that.
Seriously, nothing beats a delightful plate of traditional southern recipes .
Storage & Make-Ahead
Storage Guidelines
Alright, listen up. fried chicken is best when it’s hot and fresh, but if you have leftovers (which is rare, trust me!), let them cool down before tossing them in an airtight container.
You can keep them in the fridge for up to 3 days .
Preservation Methods
If you want to store it longer, pop it in the freezer! Just make sure to freeze it in single layers first, so it doesn’t clump together.
Reheating Instructions
To reheat, bring out your trusty oven. preheat it to 400° f and place the chicken on a baking tray.
Bake for about 15- 20 minutes to get that coating back to its crispy glory!
Freshness Duration
For optimal freshness, eat your fried chicken within three days. After that, it might lose some of that perfect chicken frying oil temperature magic.
Creative Variations
Flavor Adaptations
Switch things up! how about a lemon herb fried chicken by adding lemon zest or fresh herbs to your buttermilk? maybe even try crunchy chicken recipes with the addition of crushed cornflakes for that fun extra crunch.
Dietary Modifications
Got gluten-free folks in the fam? Swap all-purpose flour for a gluten-free blend. Easy peasy!
Seasonal Twists
Depending on the season, consider adding seasonal ingredients to your marinade. Fresh sage in the fall? Yes, please!
Regional Variations
Traveling the U.S. in your kitchen? Play with different regional influences, like making a California-style fried chicken with lime and cilantro. The sky's the limit!
Complete Nutrition Guide
Detailed Breakdown
Alright, let’s get real about the numbers. This fried chicken gives you about 410 calories per serving but packs a punch with 27 grams of protein ! Yes, please!
Health Benefits
Hey, don’t shy away from fried chicken—it’s all about balance. Pair it with some healthy sides, and you’re golden.
Dietary Considerations
If you’re watching your fat intake, you might want to skip the skin, or go light on the oil while frying. But if you’re treating yourself, enjoy that crispy goodness—you deserve it!
Portion Guidance
Four pieces? That’s about what one serving looks like. But hey, if you’re feeding a crowd, don’t be afraid to double the recipe. Fried chicken for gatherings is always a hit!
Expert FAQ Solutions
Common Questions
Got confusion about frying time? Aim for 8- 10 minutes per side after the initial browning. That’ll get you to 165° F inside without burning the outside!
Troubleshooting Guide
If your chicken isn’t crispy, the oil was likely too cool. Next time, crank that heat, and don’t crowd the pot!
Success Tips
Whatever you do, don’t rush the marinade stage. Trust me, your taste buds will thank you!
Variations Explained
Want to kick it up a notch? Make variations in your spices, or try using bone-in chicken to enhance that juiciness.
So there you have it, friends! cooking up southern style fried chicken with a crispy flavorful coating can be a game changer for your family dinners.
Embrace experimentation, get a bit messy in the kitchen, and savor the deliciousness!
Southern Style Fried Chicken with a Crispy Flavorful Coating Card
⚖️ Ingredients:
- 1 cup buttermilk (240 ml)
- 1 tablespoon hot sauce (15 ml), optional
- 1 teaspoon garlic powder (5 g)
- 1 teaspoon onion powder (5 g)
- 1 teaspoon paprika (5 g)
- 1 teaspoon cayenne pepper (5 g), optional
- 2 cups all-purpose flour (240 g)
- 1 teaspoon salt (5 g)
- 1 teaspoon black pepper (5 g)
- 4 pieces of bone-in chicken (legs and thighs recommended, about 2-2.5 lbs or 900-1135 g total)
- Oil for frying (vegetable or peanut oil)
🥄 Instructions:
- Step 1: In a large mixing bowl, combine buttermilk, hot sauce (if using), garlic powder, onion powder, paprika, and cayenne pepper. Add chicken pieces to the marinade, ensuring they are fully submerged. Cover and refrigerate for at least 30 minutes (up to overnight).
- Step 2: In a shallow dish, whisk together flour, salt, and black pepper. Set aside.
- Step 3: Remove chicken from buttermilk marinade, letting excess drip off. Dredge each piece in the flour mixture, pressing lightly to adhere, then shake off excess.
- Step 4: In a heavy-bottomed pot, heat oil to 350°F (175°C). Use a thermometer to maintain temperature.
- Step 5: Carefully add chicken pieces to the hot oil without overcrowding the pot. Cook for 10-12 minutes on the first side until golden brown, then flip and cook for another 8-10 minutes, or until cooked through (internal temperature should reach 165°F or 74°C).
- Step 6: Transfer fried chicken to a wire rack or paper towels to drain excess oil. Let rest for 5-10 minutes before serving.
Previous Recipe: Easy Sweet Hello Kitty Pasteles in 50 Minutes: A Fun Baking Adventure!
Next Recipe: Delicious Quick Ginger Chicken with Zesty Lime Flavor: 5 Easy Ways to Elevate Your Dinner!