Crispy Colby Jack Cheese Sticks: Quick & Delicious
Looking for the perfect snack? Fry delicious Colby Jack cheese sticks fast for a cozy game night treat that everyone will love. Trust me, they’re amazing!

- Fry Delicious Colby Jack Cheese Sticks Fast
- Your Go-To Guide for Essential Ingredients
- Fry Delicious Colby Jack Cheese Sticks Fast
- Pro Tips & Secrets for Frying Delicious Colby Jack Cheese Sticks Fast
- Perfect Presentation Hacks
- Storage & Make-Ahead Tips
- Get Creative with Variations
- Complete Nutrition Guide
- In Conclusion: Get Frying!
- Frequently Asked Questions
- Recipe Card
Fry Delicious Colby Jack Cheese Sticks Fast
A Cheesy Escape into Nostalgia
Oh my gosh, can we talk about cheese sticks for a second? growing up, they were the golden nuggets of any family gathering or game night.
Picture this: it’s friday night, the aroma of popcorn fills the air, and you’ve got a mountain of cheesy snacks ready to dive into.
Fry delicious colby jack cheese sticks fast has become my go-to recipe that instantly takes me back to those carefree days.
It’s crazy how food can whisk you off into memories, isn’t it?
A Cheesy Journey Through Time
So, where did these crunchy delights come from? fried cheese sticks are rumored to trace their roots back to european traditions of frying cheese, but they really took off in america.
Nowadays, they’re on almost every restaurant appetizer menu. they’ve morphed into a beloved dish for game day gatherings and chill hangouts alike.
Guess what? making your own is super easy! set aside about 50 minutes to whip up these bad boys, and you’ll have roughly 8-10 crispy cheese sticks to share (or not, no judgment here!).
Plus, they're wallet-friendly—especially compared to dining out.
Why You’ll Love Them
Let’s talk about the key benefits of these cheese sticks, shall we? first up, there’s the nutritional aspect. colby jack cheese is not just about ooey-gooey goodness; it’s also a source of protein.
These sticks bring the best of both worlds: they’re comforting yet a little indulgent.
They’re the perfect game day snacks . whether you’re serving them at a tailgate, movie night, or birthday bash, they’ll be a hit every time .
And have you ever tried pairing cheese sticks with a spicy dipping sauce? trust me; it takes that flavor punch to a whole new level!
Compared to other appetizers, cheese sticks are so darn easy to make. seriously, you don’t need to be a culinary genius to nail it! you’re talking about simple breading and frying with some cheese lovers snacks magic sprinkled in.
Plus, they make for great family-friendly recipes , which is a massive win in my book.
Making It Personal
Now, i have to admit, i’ve had some major flops in the kitchen—like that time i tried to make gourmet cheesy bread and ended up with a charred mess.
We laughed it off, but now i’m way more careful about frying techniques. let’s learn from my mistakes, yeah? these crispy cheese sticks are practically foolproof, and they’re so darn delish that they’ll impress everyone.
Transitioning to Ingredients
Ready to get this cheesy party started? in just a moment, i’ll break down the simple ingredients you’ll need to create your very own crispy, crunchy heaven.
Trust me, once you master this recipe, every gathering will feel a teeny bit more festive with those golden-brown cheese sticks stealing the show.
Keep those taste buds ready because it’s about to get cheesy!
Your Go-To Guide for Essential Ingredients
Hey there, food ensoiasts! ever find yourself in the kitchen, staring blankly at your spice rack or pantry, and wondering where to start? we’ve all been there.
Knowing your ingredients is key, especially if you want to fry delicious colby jack cheese sticks fast ! so, let’s break this down in an easy-peasy, friendly way.
Premium Core Components
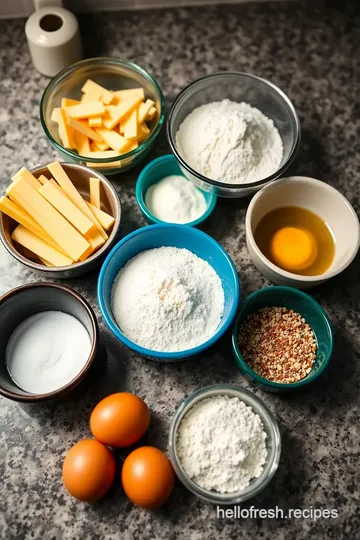
Let’s talk about the heart of your kitchen - those premium core components . You want the good stuff, right?
Detailed measurements help keep things precise. in case you’re wondering, that’s 1 cup (120g) of flour for your cheese sticks.
In metric, that’s about 120 grams . and for the measurement nerds out there, my experience says a kitchen scale is a game-changer!
When you’re out shopping, look for quality indicators . fresh ingredients are your best friends. for example, colby jack cheese should smell rich and creamy but not overly pungent.
You want it fresh – check the expiry date and give it a little squeeze!
Storage is crucial. keep your cheese wrapped tightly to avoid those weird freezer bites. and for shelf life? generally, your cheese stays good for around two to three weeks in the fridge if stored well.
Signature Seasoning Blend
Now, let's get zesty! the signature seasoning blend can make or break your dish. for cheesy cravings, you might sprinkle garlic powder or onion powder on those cheese sticks.
Honestly, they add a ton of flavor!
Consider using fresh herbs, like parsley, or even some spicy cheese sticks with jalapeño flakes. don't be afraid to experiment.
Each region has its spin: think ranch seasoning in the midwest, or zesty old bay in the south!
If you’re looking for easy appetizer recipes , consider parmesan cheese dusted on top of your crispy sticks. Yum!
Smart Substitutions
Alright, life is unpredictable; we need to be flexible with smart substitutions . out of eggs? use a flaxseed mixture instead! a quick mix of 1 tablespoon of flaxseed with 3 tablespoons of water makes a great binder.
And let’s talk diet. wanna go gluten-free? simply swap all-purpose flour for a gluten-free option, and you’re good to go! if you're stuck without breadcrumbs, use crushed cornflakes! they add a quirky twist and a nice crunch.
Kitchen Equipment Essentials
Let’s not forget about your kitchen equipment essentials ! you don’t need a michelin star kitchen to whip up deliciousness.
Grab yourself a deep frying pan or a heavy-bottomed pot; a good one will evenly distribute heat, preventing those tragic burnt moments.
And trust me, nobody likes soggy cheese sticks.
You’ll also want some shallow bowls for breading. if you can find a slotted spoon or spider strainer, give yourself a pat on the back! those tools make it easy-peasy to lift your golden sticks from the bubbling oil.
Wrapping It Up
So there you have it, a whirlwind tour of what you need in your kitchen to support all your cheesy dreams! understanding these essential ingredients and tools is key for anyone wanting to make tasty treats – especially those crispy cheese sticks with some great dipping sauces.
Before diving into those crunchy cheese snacks , remember to prep your cheese sticks well and keep the oil temperature in check.
Now that you’re prepped with all this knowledge, let's move on to the steps to whip up those crispy colby jack cheese sticks: quick & delicious ! your family and friends will thank you later, and trust me, they’ll be coming back for more!
Fry Delicious Colby Jack Cheese Sticks Fast
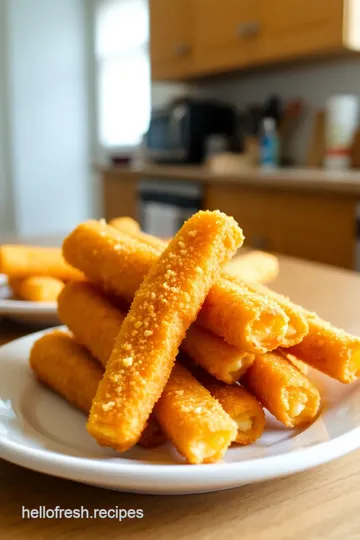
When you’re craving a quick snack or need an easy appetizer for game day, these crispy colby jack cheese sticks will totally hit the spot.
I mean, who doesn’t love that gooey, melty cheese wrapped in a crunchy golden-brown coating? it’s like a little piece of heaven! perfect to serve at a gathering or just to enjoy during a cozy night at home, these cheese sticks are a surefire way to impress your friends and family.
Seriously, just wait until you see their faces when you tell them you're making homemade fried cheese sticks!
Essential Preparation Steps
Now, before we dive into the fun frying part, let’s talk mise en place —which is just a fancy way of saying get your stuff together! you’ll want to have all your ingredients set.
That means cutting 8 ounces of colby jack cheese into those perfectly thick sticks and gathering your flour, eggs, and breadcrumbs.
Oh, and don’t forget the spices! trust me, seasoning is key .
Time management is also huge here. you’ll need to freeze your cheese sticks for about 30 minutes so they don’t melt into a gooey mess while frying.
And let’s be real, you definitely don’t want that. organizing your workspace will keep things smooth and efficient. stack your bowls and tools so you can access everything easily.
Safety is no joke, especially when frying. make sure to monitor the oil temperature—you’re aiming for 350° f ( 175° c) .
That’s hot! use a thermometer; it’ll really save you from drowning your snacks in grease.
Step-by-Step Process
Alright, here’s where the magic happens.
-
Prep the Cheese Sticks: Cut the cheese into ½-inch thick sticks and freeze them for 30 minutes . This step is crucial for preventing melting while frying.
-
Set Up Your Breading Stations:
- In one bowl, put your flour .
- In another, whisk two eggs .
- In the final bowl, mix your seasoned breadcrumbs with spices.
-
Bread the Cheese Sticks: Start working! Coat each cheese stick in flour, dip it in the egg, and then roll it in breadcrumbs. Make sure they’re well-coated.
-
Heat the Oil: In a deep frying pan, heat the vegetable oil over medium heat to 350° F . Check with a thermometer.
-
Fry the cheese sticks: carefully slide in the cheese sticks in batches. fry them for 2- 3 minutes until they’re golden brown.
Keep it moving—turn them occasionally so they don’t burn.
-
Drain and Serve: When they’re crispy, use a slotted spoon to transfer them to paper towels to soak up that extra oil.
Expert Techniques
So here’s where i get a bit passionate. the right techniques can really elevate your cheese sticks. pay attention to the oil temperature ; too hot and you’ll have burnt cheese sticks.
Too cold? hello, greasy mess!
Also, be mindful of timing. if you pull your cheese sticks out too early, they’ll be gooey inside, and not in a good way.
Aim for a beautiful golden color; that’s usually your best visual cue for doneness.
Success Strategies
Let’s chat about some common mistakes to avoid. don’t skip the freezing step! if the cheese isn’t firm, it’ll just slip-n-slide around in that oil.
And when you’re frying, make sure not to overcrowd the pan. too many cheese sticks will drop the oil temperature, and you don’t want that!
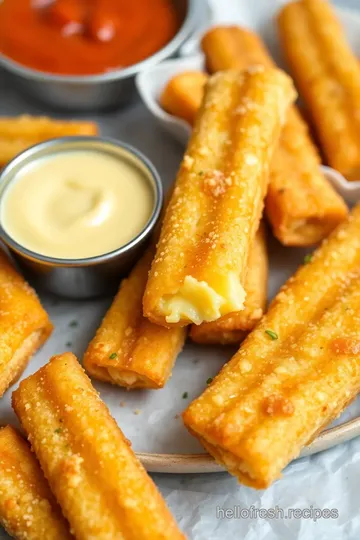
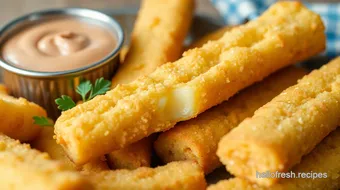
For the ultimate quality assurance , try making a test batch first. If you feel like a pro, go big with a party platter! These crispy cheese sticks pair perfectly with all sorts of dips—think ranch, marinara, or perhaps a spicy mustard kick for those who like to spice things up!
Final Thoughts
At the end of the day, what you want is for these cheese sticks to be the best they can be.
You want them to have that perfect crunch and gooey inside every time. and remember, you can always experiment with different cheese stick variations.
Want to go spicy? try using pepper jack instead of colby jack. or go wild and mix cheeses!
Craving to try your hand at something new? Check out homemade cheese sticks as a perfect treat! Honestly, once you fry delicious Colby Jack cheese sticks fast , you’ll be hooked.
Okay, one last thing—you don’t need to wait for a special occasion to whip these up. they’re perfect for anytime you’re feeling snacky.
So, go ahead and get your fry on—you’ve got this!
As we wrap up, if you’re looking for more tips and tricks, let’s jump to the next section: Additional Information!
Pro Tips & Secrets for Frying Delicious Colby Jack Cheese Sticks Fast
Alright, friends! let’s chat about how to really fry delicious colby jack cheese sticks fast without losing your mind in the kitchen.
Cooking should be fun, right? here are some of my favorite personal insights and secrets to make these cheese sticks the talk of the snack table!
First off, don’t rush the chilling. if you’re looking for that gooey, melty cheese goodness, freeze those sticks for at least 30 minutes .
This also prevents the cheese from melting too quickly while you fry them up. you’ll thank me later when your friends are buzzing over those perfect golden bites.
Next, let’s save some time in the kitchen! use a three-bowl setup for the dredging process. it might sound simple, but it streamlines things when you’re trying to bread like a pro.
Plus, use one hand for wet dipping and one for dry. this little trick saves you from the dreaded “sticky fingers” disaster.
Trust me, you don’t want to be clawing at your phone with gooey hands after you whip these up.
And oh, the flavors! enhancing your cheese sticks is as easy as adding a bit of spice to the breading.
A sprinkle of cayenne or paprika will totally elevate that crunch. don't be shy, either – be adventurous and toss in your favorite spices.
It's your snack; make it sing!
When it comes to presentation, think simple and classy. plating can make even easy appetizer recipes feel gourmet. use a pretty plate to stack your cheese sticks and toss in some fresh herbs for color.
Got any leftover parsley or chives? toss them on! it adds that rustic vibe without any extra hassle.
Perfect Presentation Hacks
Speaking of presentation, let’s dive into some quick plating techniques. round up those crispy cheese sticks and stack ‘em like a tower, leaning on each other for a bit of a chef’s touch .
Think of it as a little cheese architecture; they’ll look as tasty as they are!
Don’t stop at just stacking; go wild with your garnishes! a handful of fresh parsley or a drizzle of hot sauce can make your dish pop visually.
You’ll want to be the one serving the best cheese stick platter at your next gathering!
Combine colors wisely, too. bright red marinara with the golden cheese sticks creates a visual feast. you eat with your eyes first, right? paired with a bold dipping sauce, these cheese sticks become the star of any party.
Storage & Make-Ahead Tips
Now for the practical stuff: storage! these cheese sticks can definitely be made ahead and stored. once you’ve made them, just keep them in an airtight container for up to three days .
But let’s be real, they probably won’t last that long!
If you want to freeze 'em for later (because you’re definitely going to want these crispy snacks on-hand), pop them in a single layer on a baking sheet until frozen solid and then transfer to a freezer bag.
They’ll stay fresh for a month or so.
Reheating is just as easy. toss them in the oven at 400° f for about 10 minutes to bring back that crispy magic.
Microwaving just won’t cut it for this kind of cheesy delight. remember: we want them crunchy, not soggy!
Get Creative with Variations
Feeling a little adventurous? customize your cheese sticks with some flavor adaptations. swap out the colby jack for pepper jack if you’re craving a kick or try a blend of cheeses for an explosion of taste.
Big cheese lovers can also try making cheesy stick variations by adding herbs to the breading or even mixing in finely chopped jalapeños for some heat!
Don't forget about dietary needs. For gluten-free goodness, swap the all-purpose flour with gluten-free alternatives and enjoy those crunchy cheese snacks without a worry.
Complete Nutrition Guide
As for the nutrition side, don’t be shocked when you find out these cheesy treats pack a punch! each serving of crispy perfection gives you roughly 300 calories—totally worth indulging in now and then.
But remember, moderation is key!
Consider pairing your cheese with something nutritious. serve alongside a salad or steamed veggies to balance your plate. creative snacks like this can still be part of healthy eating when enjoyed in context.
In Conclusion: Get Frying!
So there you have it, my friends! with these tips and tricks, you’re ready to fry delicious colby jack cheese sticks fast and impress your family or guests at any gathering.
Easy to make snacks don’t have to be boring. make ‘em fun, make ‘em fancy – but most importantly, enjoy every cheesy bite.
Now grab your ingredients, roll up those sleeves, and let’s make some magic happen in the kitchen! you’ll have delicious finger foods in no time, and trust me, your friends will be begging for the recipe! happy frying!
Frequently Asked Questions
How can I Fry Delicious Colby Jack Cheese Sticks Fast without mess?
To minimize mess, use a deep frying pan with high sides to contain splatter and a slotted spoon to remove the cheese sticks. It’s also helpful to prepare a designated area for draining the cheese sticks using paper towels right next to your frying setup to make the process quicker and cleaner.
Can I make tweaks to the breading for my cheese sticks?
Absolutely! You can experiment with different spices like paprika, cayenne pepper, or Italian herbs to enhance the flavor of your breading. Additionally, consider using Panko breadcrumbs for added crunch, or mix in grated Parmesan cheese for extra flavor.
What is the best way to store leftover cheese sticks?
To store leftover cheese sticks, allow them to cool completely before placing them in an airtight container. They can be refrigerated for up to 3 days. For longer storage, wrap them well and freeze for up to 2 months—just reheat them in the oven for a crispy finish!
How can I tell if the oil is hot enough for frying cheese sticks?
The best way to check is by using a cooking thermometer; the oil should reach 350°F (175°C). If you don’t have a thermometer, you can test it by dropping in a small piece of bread; it should sizzle and turn golden brown within about 30 seconds if the oil is ready.
Can I bake Colby Jack cheese sticks instead of frying them?
Yes, you can bake the cheese sticks for a healthier option! Preheat your oven to 400°F (200°C) and place the breaded cheese sticks on a baking sheet lined with parchment paper. Bake for about 10-15 minutes or until they are golden brown and crispy—keep an eye on them to prevent melting!
What are some good dipping sauces for cheese sticks?
Popular dipping sauces include marinara sauce, ranch dressing, or spicy mustard. You can also make a creamy garlic dip or a zesty avocado dip to add variety to your cheese sticks experience!
Crispy Colby Jack Cheese Sticks: Quick & Delicious Card
⚖️ Ingredients:
- 8 ounces (225g) Colby Jack cheese, cut into ½-inch thick sticks
- 1 cup (120g) all-purpose flour
- 2 large eggs
- 1 cup (80g) seasoned breadcrumbs
- ½ teaspoon (2.5g) garlic powder
- ½ teaspoon (2.5g) onion powder
- Pinch of salt and pepper
- Vegetable oil, for frying (approximately 2-3 cups)
🥄 Instructions:
- Step 1: Cut the Colby Jack cheese into ½-inch thick sticks. Arrange cheese sticks on a plate and freeze for 30 minutes until firm.
- Step 2: In the first bowl, add all-purpose flour. In the second bowl, whisk the eggs until smooth. In the third bowl, mix seasoned breadcrumbs with garlic powder, onion powder, salt, and pepper.
- Step 3: Dredge each cheese stick in flour, shaking off excess. Dip in eggs, letting excess drip off. Coat thoroughly with breadcrumb mixture.
- Step 4: In a deep frying pan, heat the vegetable oil over medium heat to 350°F (175°C). Use a thermometer to check the oil temperature for frying.
- Step 5: Carefully add cheese sticks to the hot oil in batches, ensuring not to overcrowd. Fry for 2-3 minutes, turning occasionally until golden brown and crispy.
- Step 6: Using a slotted spoon, transfer fried cheese sticks to a plate lined with paper towels to drain. Serve hot with your choice of dipping sauce.
Previous Recipe: How to Make a Quick Mediterranean Grill Chicken Grain Bowl Fast
Next Recipe: My Grandmother's Savory Cheese Squares: Bake in 35 Minutes!