Knead Fresh Milled Pizza Dough for Joyful Pies
Craving the best Knead Fresh Milled Pizza Dough for Joyful Pies? Discover my simple recipe for a crispy, flavorful crust. You'll love it!

- Knead Fresh Milled Pizza Dough for Joyful Pies
- Essential Ingredients Guide for Perfect Pizza Dough
- Transition to Instructions
- Mastering Professional Cooking: Knead Fresh Milled Pizza Dough for Joyful Pies
- Pro Tips & Secrets for the Perfect Dough
- Perfect Presentation Tips
- Storage & Make-Ahead Techniques
- Creative Variations
- Complete Nutrition Guide
- Wrapping It Up
- Frequently Asked Questions
- Recipe Card
Knead Fresh Milled Pizza Dough for Joyful Pies
Imagine it’s friday night. the weekend’s creeping in, and you’re in your cozy kitchen, the aroma of fresh milled flour wafting through the air.
You’ve got the music on, and your friends are coming over, ready for a pizza showdown. knead fresh milled pizza dough for joyful pies isn’t just a catchy title; it’s your ticket to pizza success! trust me; nothing feels better than pulling a hot, rustic pizza out of the oven!
Pizza with a Touch of History
Let’s take a quick trip back in time. the art of pizza-making traces back to italy, where people have been crafting those beloved pies for centuries.
Originally, it used simple ingredients—flour, water, salt, and yeasts. fast forward to today, and the love for homemade dough hasn’t faded one bit! with our modern twist on traditional recipes, we're focusing on fresh milled flour .
Not only does it amp up the flavor, but it’s also healthier! that rustic pizza base is about to become your new favorite!
Modern-day Considerations
Making homemade pizza dough isn’t rocket science, but it does take a little practice. you don’t need to be a pro to nail this recipe.
It’s rated about a medium difficulty level . you’ll need roughly 20 minutes for active prep , with an hour of dough resting time .
The total time is just around 1 hour and 35 minutes , which includes baking. as for the cost? it’s super affordable! just a few simple ingredients and you’ll get two medium pizza crusts , or about four servings.
Perfect for sharing—or not!
Why It's Worth It
Now, let’s talk health benefits. this dough is packed with whole grain goodness thanks to fresh milled flour . if you’re aiming for healthier pizza options, this is a game-changer! you can still indulge in fun pizza toppings while boosting your nutritional intake.
Plus, who doesn’t love a chewy pizza crust that’s crispy on the outside? it’s way better than any delivery option!
And speaking of servings, these delightful pies are perfect for any occasion. birthdays, movie nights, or just a casual weekend sit-down.
Friends will be raving about your craft pizza recipes long after they've finished their slices!
Unique Selling Points
Let’s be real for a second: store-bought pizza simply doesn’t hold a candle to homemade pizza dough . this dough shines with its dough elasticity , and it can handle any toppings you throw at it.
Plus, you’ll have that sense of pride every time you serve it. it’s like being a rock star in the kitchen!
So whether you’re a pizza newbie or looking to hone your pizza making techniques , this recipe can help. think of it as a gateway to refine your bread-making skills .
With a few kneading dough tips, you’ll be turning out pizza after pizza!
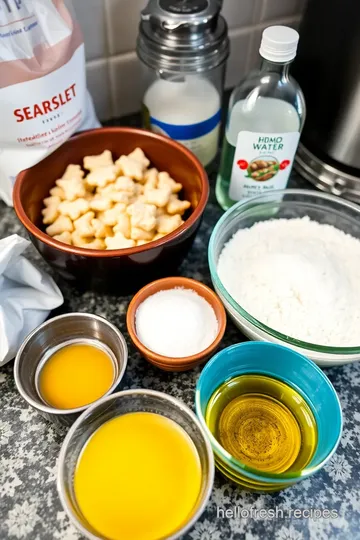
Ready to get started? Before you dive straight into the mixing bowl, let’s gather all those delicious ingredients together. You’ll need:
- 4 cups fresh milled flour (whole wheat or spelt for that rustic flavor)
- 1 ½ teaspoons sea salt
- 2 teaspoons instant yeast
- 1 ½ cups warm water ( 105° F to 110° F)
- 1 tablespoon olive oil
There we go! with these ingredients in hand, you’re all set for a pizza night that will make you the culinary hero among your friends.
Just imagine the combination of that crispy crust and flavorful toppings—absolute bliss!
Let’s get those hands kneading and bring some joy into your kitchen with this easy pizza recipe !
Essential Ingredients Guide for Perfect Pizza Dough
Making the best pizza dough is like finding the holy grail of comfort food. it all starts with the premium core components .
You want to make sure you’re using the best ingredients because that’s what will lead to a chewy pizza crust with a delightful flavor.
Let’s break it down.
Premium Core Components
When it comes to measuring, if you wanna keep things simple, just know that 4 cups (480 g) of fresh milled flour is your starting line.
If you’re fancy and want the metric conversions, there you go! next up is 1 ½ teaspoons (9 g) of sea salt and 2 teaspoons (8 g) of instant yeast .
These ingredients not only add flavor but also affect the overall dough elasticity .
Now, storage guidelines are crucial. keep your flour in a cool, dry place to maximize shelf life, usually around six months to a year.
And fresh yeast? gotta keep that in the fridge, where it’ll last about two to three months.
When picking ingredients, check out quality indicators . fresh flour should smell nutty and earthy—if it smells off, toss it. for yeast, make sure it’s active; just mix it with warm water and a pinch of sugar—it should foam up within ten minutes.
Oh, and don’t forget about that dough resting time . that’s where the magic happens!
Signature Seasoning Blend
Now let’s get into how to spice things up for a killer crust. classic combos work like a charm here.
Think garlic powder, dried oregano, and maybe some crushed red pepper flakes. they’ll give your rustic pizza base a whole different level.
Pair herbs like basil with those spices, and you’ll have an aromatic mix that’ll transport your pizza to traditional italian pizza territory.
Honestly, you can play around with your blends—like try adding fresh rosemary or thyme. they add nice flavor notes without being overwhelming.
Smart Substitutions
Sometimes you just gotta improvise! if you’re outta flour, you could totally use all-purpose flour instead of freshly milled flour.
It works in a pinch. and if someone’s vegan? just swap the regular pizza dough with a vegan pizza dough recipe—look for olive oil and skip any dairy.
Another handy tip? for those emergency moments when you forget to buy yeast, you can use baking powder instead, but it changes things up a bit.
It’s good to have options, ya know? plus, during different seasons, you might want to experiment with fresh ingredients from local produce.
In summer, think fresh basil and tomatoes on top!
Kitchen Equipment Essentials
Now let’s talk gear! you don’t need an entire bakery setup to make this happen. just a kitchen mixer with a dough hook (optional), some mixing bowls, and measuring cups.
A pizza stone works wonders for that crispy crust —but if you don’t have one, no sweat! a baking sheet works fine too, especially if you preheat it.
Oh, a little tip on storage: keep your flour in an airtight container, and it’ll stay fresh longer! You’ll keep your kitchen well-organized while whipping up those homemade pizza ideas.
Transition to Instructions
Once you’ve got your ingredients in check, it's time to dive into how to knead fresh milled pizza dough for joyful pies and craft that perfect artisan pizza crust .
Follow along for the step-by-step instructions and watch how easy it is to create a delicious homemade pizza from scratch.
Trust me, you’ll impress everyone with your baking skills, and those who share a slice will definitely come back for more!
Mastering Professional Cooking: Knead Fresh Milled Pizza Dough for Joyful Pies
If you’re looking to elevate your pizza game, you’ve landed at the right place! it’s all about the kneading techniques and the fresh milled flour that bring your crust to a whole new level.
Don’t worry, though; i’m here to share all my personal secrets and a few tips i learned the hard way.
Let’s dive in!
Essential Preparation Steps
Before anything, let's talk mise en place – which is just fancy chef talk for having everything ready to go.
Honestly, nothing is worse than scrambling to find the salt when your dough is already looking like a sticky mess.
Gather your ingredients: 4 cups of fresh milled flour , 1 ½ teaspoons of sea salt , 2 teaspoons of instant yeast , and make sure your water is at the right temperature – you want it between 105° f to 110° f .
Time management is crucial too. we’re talking about a total of around 1 hour and 35 minutes from start to finish.
But trust me, the outcomes are worth it. think of it as your pizza meditation time!
Now, let’s discuss organization strategies . clean as you go! this little trick keeps your workspace from looking like a tornado hit right after you’ve created a little dough masterpiece.
And safety? always remember, clean surfaces and hands are key. don't let dough sit on unwashed hands or counter!
Step-by-Step Process
Alright, let’s break it down. You want clear steps, so here we go:
-
Combine Dry Ingredients: In a big ol’ bowl, mix your fresh milled flour, sea salt, and instant yeast.
-
Mix Wet Ingredients: In another bowl, combine your warm water and olive oil.
-
Make the Dough: Pour the wet mixture into a well in the dry ingredients. Using a wooden spoon, mix until you have a shaggy dough.
-
Knead it out: dust your countertop lightly and knead that dough for about 8- 10 minutes until it’s nice and elastic.
A dough hook on a mixer? sure, if you want to cut that time to 5- 7 minutes .
-
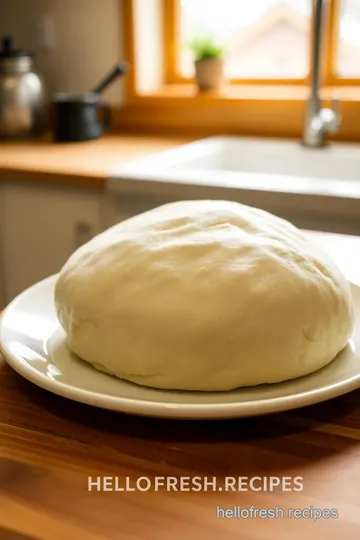
First rise: place your dough in a lightly oiled bowl, cover it, and let it rise in a warm spot for about 1 hour until it doubles.
It’s like a little dough spa session!
-
Get That Oven Ready: Preheat it to 475° F , letting your pizza stone or baking sheet warm up in there too.
-
Shape and Roll: After the rise, punch the dough down and divide it for two pizzas. Roll it out like you’re rolling with a punch—get it to your desired thickness.
-
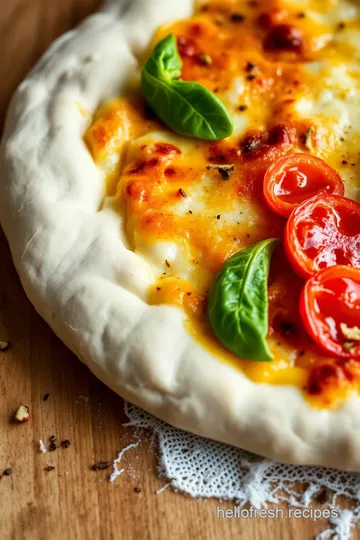
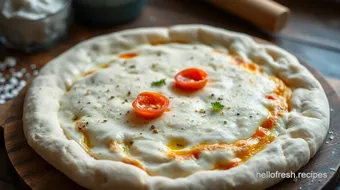
Bake: Transfer to your pizza stone or sheet, load it up with toppings, and bake for 10- 15 minutes until it’s golden brown on top.
Expert Techniques
So, here’s where it gets really good. to get that chewy pizza crust , kneading is where you really get your bread-making skills flexed.
But don’t overdo it – that can lead your dough to be tougher than a new york bagel. you want elasticity, not a brick!
Then, it’s all about those quality checkpoints . keep an eye on your temperature for the perfect bake. a quick visual cue? look for a golden-brown color and slightly puffy edges.
Learning to troubleshoot your dough can rescue a pizza night gone wrong; if it doesn’t rise enough, check your yeast.
It might not be fresh!
Success Strategies
Here’s the truth—I’ve made my fair share of pizza mistakes. Don't rush that dough resting time . The longer it rests, the better the flavor.
And here’s my biggest tip: quality assurance is everything. pay attention to your flour; using fresh milled flour will transform your traditional italian pizza into something exceptional.
Trust me, your friends will be begging for your craft pizza recipes .
Want to save time? try out some make-ahead options . you can prepare the dough in advance and keep it in the fridge for a couple of days.
Or, freeze it for later. just let it thaw and rise when you're ready for that pizza night!
Before we jump into the final delicious section, always keep in mind to think about healthy pizza options . You can totally craft a delightful whole grain pizza crust with your fresh milled flour, making sure that everyone feels good about what they're eating!
In the next section, we’ll explore some additional information to help you along your pizza-making journey! Let’s keep the pizza party going!
Pro Tips & Secrets for the Perfect Dough
Hey there, pizza lovers! if you’re diving into making knead fresh milled pizza dough for joyful pies , here are some of my top chef’s secrets that are game-changers.
Honestly, they’ll turn a regular pizza night into an artisan experience right in your kitchen.
First off, check your yeast! the freshness of your yeast is crucial. a simple test? mix it with warm water and a bit of sugar.
If it froths up in about 10 minutes, you’re golden. this little hack boosts that dough’s rise—no one likes a sad, flat pizza!
Next up, dough resting time is your best friend. i can’t stress this enough. give your dough the time it needs to really rise.
Aim for at least one hour in a warm spot. this patience pays off with a light and airy chewy pizza crust that just begs for toppings!
Oh, and a perfect crust? preheat that pizza stone! seriously, if you've got one, it’s a must for achieving that crispy bottom.
If not, a baking sheet flipped upside down can work in a pinch. just be sure to preheat it along with your oven.
Perfect Presentation Tips
Now that you’ve got the delicious dough ready, let’s talk presentation ! trust me, a pie that looks good probably tastes good, too, right? when it comes to plating, color combinations matter .
A vibrant spread of a rich marinara, fresh basil, and colorful veggies not only looks appetizing but also balances flavors.
Garnishes can elevate your pizza. a sprinkle of fresh herbs or a drizzle of high-quality olive oil can really knock it out of the park.
Play around with textures too—crunchy toppings like pine nuts or toasted garlic can add an unexpected twist!
Also, consider your plating techniques. a good, rustic pizza base that’s been rolled out evenly can make a world of difference.
And don’t forget to allow space on the plate! a cluttered presentation can steal the spotlight from your artful pie .
Storage & Make-Ahead Techniques
One of the best things about this pizza dough is how well it keeps. here's the deal: if you’re not baking it all at once, simply wrap the dough in plastic wrap and pop it in the fridge.
It'll stay fresh for about three days . just make sure to let it warm up and come to room temperature before stretching it out.
You can also freeze the dough ! wrap it tightly in plastic and stash it away for up to a month.
When you’re ready to use it, just thaw it in the fridge overnight. easy peasy!
When it comes time to reheat leftover pizza, aiming for that dough’s perfect texture? try using your oven instead of the microwave.
Set it to around 375° f ( 190° c) and bake for a few minutes. you’ll get that crispy crust back without the sogginess!
Creative Variations
Feeling adventurous? Let’s jazz up your Knead Fresh Milled Pizza Dough for Joyful Pies ! You can play with flavors and textures in loads of ways.
How about an herb-infused crust ? Toss in some dried oregano or basil when mixing your dry ingredients. If you're in a hurry, you could even get a vegan pizza dough going by swapping olive oil for aquafaba—trust me, it works!
Seasonal toppings also amp up excitement. grapes and goat cheese in the fall, zucchini and fresh mozzarella in the summer? yes, please! you can adapt according to holiday themes, like a thanksgiving pizza with turkey and cranberry sauce.
Get creative!
Complete Nutrition Guide
We all want our pies to be a bit healthy, right? this dough is made with fresh milled flour , which is loaded with nutrients.
You get fiber, protein, and whole grains. if you're concerned about nutrition, pair it with colorful veggies on top for added supporting nutritional values .
You’re looking at about 180 calories per serving , but feel free to pile on those veggies for a guilt-free indulgence.
Aim for a balanced plate with fiber-rich toppings and lean proteins for that wholesome vibe.
Wrapping It Up
So, there you have it! with these tips tucked away, you’re ready to embark on your pizza-making adventure. remember, making your own dough isn't just about the end product; it’s about the joy of creating something delicious.
Don’t hesitate to experiment with flavors and techniques. who knows? you might just create the next big pizza trend!
Bake your way to deliciousness and have fun doing it because pizza night should always be joyful—happy kneading!
Frequently Asked Questions
What is the best way to knead fresh milled pizza dough for joyful pies?
The best way to knead fresh milled pizza dough is to turn it onto a floured surface and use the heel of your hand to press and stretch the dough. Fold it over and repeat this process for about 8-10 minutes until the dough is smooth and elastic. Alternatively, you can use a kitchen mixer with a dough hook on low speed for 5-7 minutes, making it easier for beginners.
How long should I let the dough rise?
You should let the kneaded dough rise for about 1 hour, or until it has doubled in size. Make sure to cover it with plastic wrap or a kitchen towel to maintain moisture. A warm, draft-free place helps promote successful rising.
Can I store leftover pizza dough, and if so, how?
Yes, you can store leftover pizza dough! After the first rise, tightly wrap it in plastic wrap or place it in an airtight container and refrigerate it for up to 3 days. You can also freeze the dough for up to 3 months, but be sure to let it thaw in the fridge overnight before using it.
Are there any nutritional benefits to using fresh milled flour?
Yes, fresh milled flour retains more nutrients compared to all-purpose flour, as it contains the whole grain, including the bran, germ, and endosperm. This means you get higher fiber content, essential vitamins, and minerals in your pizza dough, making it a healthier option overall.
What are some variations I can try with fresh milled pizza dough?
You can experiment by adding dried herbs like oregano or basil to the dough for added flavor. For a gluten-free option, use a specialized gluten-free flour blend designed for pizza. You can also substitute half the fresh milled flour with whole wheat for a heartier texture.
How can I ensure a crispy crust when baking my pizza?
To achieve a crispy crust, preheat a pizza stone or baking sheet in your oven at 475°F (245°C) for at least 30 minutes before baking. Also, make sure not to overload your pizza with toppings, as excess moisture can lead to a soggy crust. This approach will help you get a delightful crust with every bake!
Knead Fresh Milled Pizza Dough for Joyful Pies Card
⚖️ Ingredients:
- 4 cups (480 g) fresh milled flour (e.g., whole wheat or spelt)
- 1 ½ teaspoons (9 g) sea salt
- 2 teaspoons (8 g) instant yeast
- 1 ½ cups (360 ml) warm water (105°F to 110°F or 40°C to 43°C)
- 1 tablespoon (15 ml) olive oil
🥄 Instructions:
- Step 1: In a large bowl, whisk together the fresh milled flour, sea salt, and instant yeast until evenly mixed.
- Step 2: In a separate bowl, combine the warm water and olive oil.
- Step 3: Create a well in the center of the dry ingredients and pour in the wet mixture. Mix with a wooden spoon until a shaggy dough forms.
- Step 4: Transfer the dough to a floured surface and knead for about 8-10 minutes until smooth and elastic.
- Step 5: Place the dough into a lightly oiled bowl, cover with plastic wrap or a towel, and let it rise in a warm place for about 1 hour, or until doubled in size.
- Step 6: Preheat your oven to 475°F (245°C), with the pizza stone or baking sheet inside.
- Step 7: Once risen, punch down the dough and divide it into two equal portions. Shape each into a round.
- Step 8: On a floured surface, roll out one portion into your desired pizza size and thickness.
- Step 9: Transfer the rolled-out dough onto a parchment-lined pizza peel or directly onto the preheated pizza stone.
- Step 10: Add toppings as desired and bake for about 10-15 minutes or until the crust is golden brown.
Previous Recipe: Fluffy Fresh Milled Pancakes in 25 Minutes: A Family Favorite Breakfast
Next Recipe: Easy & Delicious Bake Tasty Corn Tortilla Chips in 25 Min: My Family Favorite Recipe