Rustic Fresh Pasta with Grains and Seasonal Vegetables
Craving something unique? Discover 7 irresistible recipes using fresh pasta grains that combine seasonal vegetables for a wholesome meal! Try them today.

- Could Homemade Pasta Be the Secret to Happiness?
- The Journey of Rustic Fresh Pasta
- The Ultimate Guide to Mastering Rustic Fresh Pasta with Grains and Seasonal Vegetables
- What Makes This Recipe Special
- Health and Nutrition Highlights
- Recipe at a Glance
- Perfect Ingredients Selection
- Kitchen Equipment Essentials
- Perfect Cooking Technique
- Expert Kitchen Wisdom
- Perfect Presentation
- Storage and Make-Ahead
- Creative Variations
- Complete Nutrition Guide
- Expert FAQ Solutions
- Recipe Card
Could Homemade Pasta Be the Secret to Happiness?
Have you ever wondered if the simple act of making fresh pasta could bring a little sparkle to your day? i mean, there’s something undeniably magic about rolling out dough, cutting it into lovely shapes, and tossing it with colorful seasonal vegetables.
You might think it’s just food, but oh, it’s so much more! it’s a way to relax, get creative, and treat yourself to something amazing.
With a prep time of just an hour and a cooking time of about 20 minutes, this rustic fresh pasta with grains and seasonal vegetables is not just an easy pasta dish but a delightful culinary adventure that anyone can embark on, regardless of skill level.
The Journey of Rustic Fresh Pasta
The story of pasta is as rich as the dish itself, stretching back centuries to the time of the etruscans, if not earlier.
It’s believed that early forms of pasta were made from just water and flour. even the romans had a hand in shaping what pasta has become today—an absolute staple of italian cuisine.
As pasta evolved, it began to adapt to various regions and ingredients. for me, fresh pasta grains represent both tradition and modernity.
It encapsulates that beautiful intersection of rustic italian dishes and vibrant, seasonally-sourced vegetables. talk about a celebration on a plate!
So, why should you invite this recipe into your kitchen? besides the wrist-deep feel of dough between your fingers, one of the unique selling points of this dish is the balance of nutrients it provides.
From wholesome grains like quinoa to vibrant, fresh vegetables, this meal isn’t just delicious—it’s good for you, too. you’ll feel fantastic serving it up, knowing it’s a tasty, healthy pasta recipe!
The Ultimate Guide to Mastering Rustic Fresh Pasta with Grains and Seasonal Vegetables
Let’s dig a little deeper into this dish and why it’s been embraced by so many. the soul of this recipe lies in its rich culinary heritage .
You’re not just following steps; you’re part of a narrative that connects back to ancient kitchens where families gathered, shared stories, and passed down recipes.
The origin story is full of twists and turns—from miss lucy's sunday dinners to trendy italian trattorias. in modern-day kitchens, pasta has never been more popular, especially with the rise of easy pasta dishes that marry tradition with contemporary flavors.
What Makes This Recipe Special
Now, what truly makes this recipe stand out? it’s all about those unique flavor combinations. the nuttiness of cooked quinoa paired with the subtle sweetness of sautéed veggies creates a dish that dances on your palate in a way that pleases every taste bud.
I’ve had my share of pasta flops—overcooked pasta, uninspired sauces—but this recipe? it’s practically foolproof. trust me, i’ve tested this method countless times with ensoiastic friends or a dinner party that needed a wow factor.
Plus, i’ve picked up a few time-saving tips along the way. when i got distracted and left my veggies on the stove too long (oops), i found that i actually preferred a slight caramelization on them.
It added a depth that rocked my world! who knew mistakes could lead to culinary magic?
Health and Nutrition Highlights
And let’s talk about nutrition for a second. this dish is loaded with goodness— nutritional benefits abounding from fresh veggies to whole grains.
It’s vegetarian-friendly, which is perfect for gatherings, and it’s easily adaptable for gluten-free options too! feeling adventurous? swap in barley or farro for even more texture.
Eating well doesn’t have to feel like a chore; it can be delicious and fulfilling!
Recipe at a Glance
So, what do you need to know before diving in?
- Total Preparation Time: 1 hour
- Cooking Time: 20 minutes
- Skill Level Required: Medium (but honestly, you can totally do it!)
- Serving Size: This recipe yields enough for 4 hungry adventurers
- Cost Efficiency: Affordable ingredients are a big plus, and let’s face it, who doesn’t love a good meal that doesn’t break the bank?
Ready to embark on this delicious journey? Next up, let’s talk about the ingredients that will bring this Rustic Fresh Pasta to life!
Perfect Ingredients Selection
When it comes to making rustic fresh pasta with grains and seasonal vegetables , the right ingredients set the tone for a glorious culinary adventure.
I still remember the first time i tried my hand at homemade pasta. it was a bit messy, but boy, was it rewarding! here’s how to nail your ingredient selection.
Premium Core Ingredients
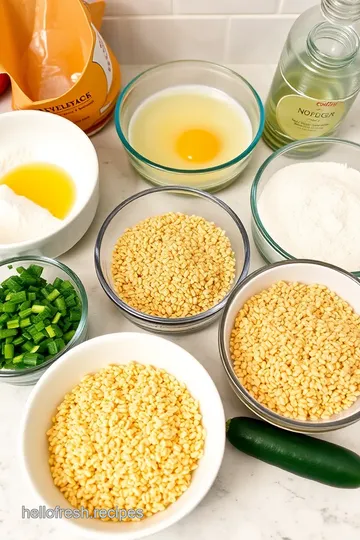
To get started on your fresh pasta, you’ll need quality ingredients . I use:
- 2 cups all-purpose flour (plus extra for dusting): Go for a good brand; it can make all the difference. Check for a fine texture and a light color.
- 3 large eggs : Freshness is key! Try to get organic or free-range if you can; they’ll add richness to your dough.
- 1/2 teaspoon salt : Don’t forget this! It enhances flavor.
- 1 tablespoon olive oil : A good quality olive oil not only helps in flavoring but also gives some flexibility to the dough. If you can find an extra virgin oil, even better!
- 1/4 cup water (if needed): Depending on humidity, you might need this to bring your dough together.
Storage guidance: keep the flour in a cool, dry place—i'm always fumbling around looking for mine in the pantry. eggs are best stored in the fridge.
And if you’ve got leftover pasta dough, wrap it tightly and toss it in the fridge for up to 2 days.
Signature Seasoning Blend
Let’s spice things up! Your dish deserves a signature touch. For this, I often go with:
- Salt and pepper : Classic seasoning, but don’t skimp on quality—sea salt works wonders.
- Fresh basil or dried : I love having fresh basil on hand! The aroma just elevates everything.
- Parmesan cheese : I usually buy a block and grate it fresh. Nothing compares!
If you want to explore, try adding a pinch of nutmeg to the pasta-cooked filling for a warm, comforting flavor.
Smart Substitutions
Life is unpredictable, and so is cooking. If you’re out of quinoa or farro for the filling, don’t fret. You can use:
- Barley or brown rice : Both work nicely, especially barley which has that lovely chewy texture.
- Vegetables like asparagus, spinach, or mushrooms if zucchini and peppers aren’t your jam. Seriously, get creative!
For dietary swaps, you could also ditch the cheese for a nut-based cheese or simply skip it if you’re going vegan.
Emergency replacements: If you realize you’ve got no flour—grab some polenta! Trust me, it’s not traditional but can still lead to a tasty adventure.
Kitchen Equipment Essentials
Now, let’s talk tools. I’ve spent way too long trying to roll out pasta using just a wine bottle. So, I’m here to save you some time:
- Rolling pin or pasta machine : My pasta machine changed the game! You can get one relatively cheap if you look around.
- Flour sifter : To keep your flour dustless—essential but easily overlooked.
- Sharp knife or pasta cutter : Good for cutting your pasta shapes.
If you don’t have a pasta machine, I promise you can still roll it out thinly—just make sure you’ve got those biceps ready!
Pro Ingredient Tips
When it comes to selections, here are some of my secret weapons:
- Eggs : Look for those with a rich, deep yolk. If you can find them, go for local farm eggs—they have the best flavor.
- Flour : Check the protein content —higher is better for pasta.
- Storage Solutions : I keep my fresh herbs in a glass of water in the fridge. They stay vibrant longer that way!
- Money-saving tips : Buy grains in bulk! They last longer and can be used in multiple dishes.
And just like that, you should be ready to dive into the next part of your cooking journey! Now that we’ve got our hearts set on making this Rustic Fresh Pasta dish sing, it’s time to talk about the fun part—the cooking instructions!
Perfect Cooking Technique
When it comes to making rustic fresh pasta with grains and seasonal vegetables , there’s something utterly satisfying about it.
The smell of dough, the vibrant colors of fresh vegetables, and that first bite of homemade pasta really create a lovely experience.
So let’s break this down into simple steps that will help you nail it every time!
Essential Preparation Steps
Before diving into cooking, we need to get our ducks in a row. This is where mise en place becomes your best friend. Here’s what I like to do:
- Gather Ingredients: Get everything out on the counter—grab your flour, eggs, vegetables, and quinoa. It’s like laying out your armor before a battle.
- Prep Techniques: Measure the flour and crack those eggs into a bowl. Dice up the zucchini and bell pepper ahead of time. This saves you from that frantic search when you just want to keep cooking!
- Time Management: The dough needs to rest for 30 minutes, so keep an eye on the clock. While it’s resting, whip up that filling so everything can come together smoothly.
- Organization Tips: Keep your workspace tidy. A clean countertop not only makes cooking easier but also feels so much more peaceful. Plus, you won’t lose that all-important tablespoon of olive oil under a pile of flour!
Professional Cooking Method
We’re going to follow a straightforward, step-by-step approach to make this dish a hit:
- Create Your Pasta Dough: Start with a mountain of flour, like a snowy peak! Create your well, crack in those eggs, and mix until it looks like a shaggy mess. Don't be afraid to get your hands in there.
- Knead with Love: Knead that dough until it’s smooth. If it feels like a brick, it probably needs a splash more water. You want it soft but not too sticky.
- Temperature Control: When cooking the pasta, make sure your water is boiling—like, really boiling. No half-hearted simmering here! Fresh pasta cooks in just a couple of minutes.
- Timing Precision: This is key—if it overcooks, it can turn mushy faster than you can say “carb heaven.”
Expert Techniques
You might stumble a bit, and that's perfectly okay! It's all part of the process. Here are some tips I’ve learned over time:
- Rolling and Cutting: Use a well-floured surface when you roll out your dough. It’s like a dance; the more confident your movements, the better your noodles! Aim for about 1/16 of an inch thick.
- Boil Wisely: When you toss that fresh pasta into boiling water, set a timer. I usually aim for about 2-4 minutes. Give it a taste test around the two-minute mark. It should still have that al dente bite.
- Critical Looks: Fresh pasta cooks faster than dried pasta. Watch closely for that subtle color change; the moment you see it, get it out!
Success Strategies
Gotcha covered here with troubleshooting nuggets!
- Test Your Dough: If it feels too dry when kneading, add a touch of water. The dough should feel a little tacky but not stick to your fingers.
- Quality Assurance: Always taste as you go! A little sprinkle of salt can make a world of difference.
- Final Texture Check: Make sure to toss the pasta with the grain filling while it's hot to let the flavors meld together. You could also add in a drizzle of olive oil to enhance everything.
If you follow these steps, you'll end up with a delightful dish where every forkful is packed with flavors—trust me, I’ve made the rookie mistakes so you won’t have to!
As you bask in the glory of your homemade creation, why not take it a step further? Let’s dive into some great variations and ways to keep this dish seasonal and fresh! Whether it’s switching up vegetables or trying a different grain, the options are endless and just as delicious!
Expert Kitchen Wisdom
Professional Insights
Ah, cooking! it's like an adventure every time you step into the kitchen. i once tried to make fresh pasta with grains thinking i could whip it up in no time, you know? ha! it took me a bit longer, but oh boy, was it worth it when i tasted that rich flavor! so, here’s a little insight straight from my kitchen: don’t rush the process.
It's tempting, i know. enjoy each step, and let your ingredients shine!
Expert Techniques
Don’t be afraid to get your hands a little messy, especially when you’re making your pasta dough. remember, kneading isn’t just a task; it’s a workout for your arms and a chance to show off that strong connection to your dish.
If you find that your pasta dough is being stubborn (trust me, it can have a mind of its own), a bit of water can be your saving grace! also, let that dough rest—seriously, don’t skip that part!
Kitchen Wisdom
Use your instincts! a pinch of salt here, a sprinkle of fresh herbs there—it’s all about balancing flavors. i learned the hard way during a dinner party that sometimes too much garlic, while delicious, can overwhelm the dish.
So, taste as you go, and trust your gut!
Success Guarantees
Following the recipe is great, but authenticity makes the dish your own. feel free to tweak—add more vegetables if you're feeling adventurous or throw in some leftover bits of cheese you’ve been meaning to use up.
Cooking should feel like a warm embrace, not a dictation.
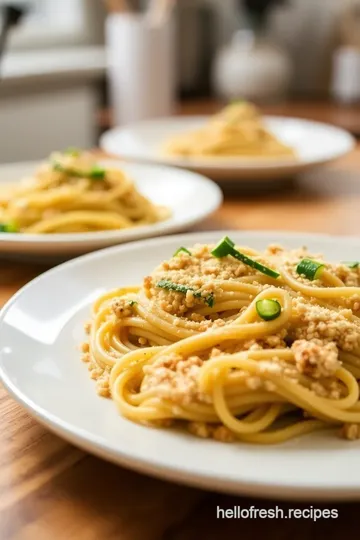
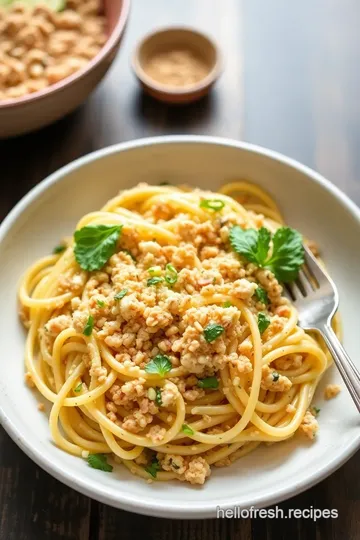
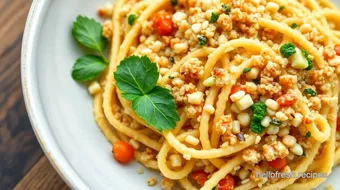
Perfect Presentation
Plating Techniques
When it comes to plating, think like an artist! i love to twirl my pasta into a neat nest on the plate.
It adds height and elegance, making your rustic pasta look like it just jumped off a restaurant menu.
Garnish Ideas
Fresh basil is an absolute must for me. not only does it smell divine, but it also adds that pop of green.
If you’re up for it, slice up some cherry tomatoes for a splash of color!
Serving Suggestions
I might be the only one, but i think serving pasta in shallow bowls looks extra fancy. you get the perfect scoop and don’t have to deal with a mountain of sauce spilling everywhere.
Don't forget a drizzle of olive oil in cooking for that extra glossy finish.
Visual Appeal Tips
Play with your food! You can scatter some peas over the top or sprinkle some parmesan like you’re a fancy chef. Remember, we eat with our eyes first!
Storage and Make-Ahead
Storage Guidelines
Planning to make this dish ahead? no problem! you can store your filled pasta in the fridge for up to two days.
Just remember to sprinkle some flour in between layers to prevent them from sticking together.
Preservation Methods
If you've made a ton, consider freezing them! make sure to freeze them in a single layer before transferring them into a bag—it’s the way to keep them from becoming a clump of mishaps.
Reheating Instructions
The secret to reheating without losing that fresh taste? Steam them gently or throw them in boiling water for just a minute. No one likes mushy pasta, right?
Freshness Tips
Always use fresh ingredients . They can transform your dish from ordinary to extraordinary, and you might find yourself feeling that little glow of satisfaction.
Creative Variations
Flavor Adaptations
Feel adventurous? Swap the grains for something like a medley of roasted veggies. You might stumble upon a flavor combo that steals your heart!
Dietary Modifications
For my vegan friends out there, you can use a flaxseed mixture instead of eggs or leave the cheese out entirely. Your pasta will still taste bomb!
Seasonal Twists
Switch it up with seasonal vegetables! In winter, add some mushrooms and kale; in spring, go for asparagus and peas. It’s all about embracing what’s popping right now!
Regional Variations
Have fun diving into regional pasta dishes. Why not try a Mediterranean twist with olives and feta? You could even sprinkle some chili flakes for a kick!
Complete Nutrition Guide
Detailed Breakdown
Nutrition shouldn’t feel like a math class! Roughly, each serving of our delightful dish is about 450 calories. Perfect for a hearty meal without going overboard.
Health Benefits
The quinoa in your filling brings fiber and protein, while the vegetables lend essential vitamins. Pretty much a win-win!
Dietary Information
These days, folks are leaning toward healthier pasta options. This recipe is drool-worthy while still being pretty darn good for you!
Portion Guidance
Four servings means everyone gets to enjoy without leftovers staring at you in the fridge. But if you're feeling extra generous, what's stopping you from a second helping?
Expert FAQ Solutions
Common Concerns
"When do I know the pasta is done?" Ah, this age-old question! Fresh pasta usually cooks in about 2-4 minutes, but keep an eye on it so it doesn’t turn into mush!
Expert Answers
Feeling nervous about making the dough? don’t be! just remember, if it feels too dry, a little water goes a long way.
Baking isn’t a perfect science, and your kitchen will not burn down.
Troubleshooting Guide
Is your pasta too sticky? Just dust it with a bit of flour—this is a forgiving process, I promise!
Success Tips
Have fun with it! The kitchen should feel like a playground, not a classroom. Mess up? So what? It’s all part of the experience.
As you dive into making this rustic fresh pasta recipe filled with grains and seasonal vegetables, just remember: cooking is about joy and connection.
Whether you mess up or knock it out of the park, each attempt brings a little more love to your table.
Bon appétit, and most importantly, enjoy the journey of cooking!
Rustic Fresh Pasta with Grains and Seasonal Vegetables Card
⚖️ Ingredients:
- 2 cups all-purpose flour (plus extra for dusting)
- 3 large eggs
- 1/2 teaspoon salt
- 1 tablespoon olive oil
- 1/4 cup water (if needed)
- 1 cup cooked quinoa (or farro, barley)
- 1 small zucchini, diced
- 1 small bell pepper, diced
- 1/2 cup peas (fresh or frozen)
- 2 tablespoons olive oil
- 2 cloves garlic, minced
- Salt and pepper to taste
- 1/4 cup grated Parmesan cheese (plus more for serving)
- 1 tablespoon fresh basil, chopped (or 1 teaspoon dried basil)
🥄 Instructions:
- Step 1: Prepare the Dough: On a clean surface, form a mound with the flour and create a well in the center. Add the eggs, salt, and olive oil into the well.
- Step 2: Incorporate Ingredients: Using a fork, beat the eggs gently and gradually incorporate the flour from the edges of the well until a shaggy dough forms. If the dough is too dry, add a tablespoon of water at a time until it comes together.
- Step 3: Knead: Knead the dough for about 8-10 minutes until it is smooth and elastic. Wrap it in plastic wrap and let it rest for 30 minutes at room temperature.
- Step 4: Sauté Vegetables: In a large skillet, heat the olive oil over medium heat. Add the minced garlic and sauté until fragrant, about 30 seconds. Add the zucchini and bell pepper; cook for 4–5 minutes or until softened.
- Step 5: Add Grains and Peas: Stir in the cooked quinoa (or grains of choice) and peas. Season with salt, pepper, and basil, then cook for another 2 minutes until heated through. Remove from heat and stir in the Parmesan cheese. Set aside to cool slightly.
- Step 6: Roll the Dough: Divide the dough into four pieces. Keep the pieces youre not using covered. Flatten one piece slightly with your hands, then roll it out using a pasta machine or a rolling pin until thin (about 1/16 inch). Dust with flour as needed to prevent sticking.
- Step 7: Cut the Pasta: Cut the rolled pasta into your desired shape (fettuccine, lasagna sheets, etc.). Dust cut pasta with flour to keep it from sticking.
- Step 8: Boil Water: Bring a large pot of salted water to a boil. Carefully drop in the fresh pasta. Fresh pasta cooks quickly, usually in about 2-4 minutes.
- Step 9: Combine with Filling: Once cooked, drain the pasta, reserving a cup of the pasta water. If using ribbon pasta like fettuccine, layer the layers with grain filling in between, like a lasagna, or toss pasta with filling as desired.
- Step 10: Plating: Serve the pasta warm, drizzled with olive oil and sprinkled with more Parmesan cheese and fresh basil.
Previous Recipe: Fresh Ginger Rewe: 7 Best Benefits & Stir-Fry Ideas
Next Recipe: Heinen's Fresh Turkey Breast: 5 Easy Steps for a Juicy Roast!